
Validate Email Workflows with a Serverless Inbox API
29 Sep 2020In this article you’ll learn how to build a serverless API that you can use to validate your email sending workflows. You will have access to unlimited inboxes for your domain, allowing you to use a new inbox for every test run.
The working code is ready for you to deploy on GitHub.
With AWS services Simple Email Service (SES) and API Gateway we can build a fully automated solution. Its pricing model fits most testing workloads into the free tier, and can handle up to 10,000 mails per month for just $10. No maintenance or development required. It also allows you to stay in the SES sandbox.
Prerequisites
To deploy this solution, you should have an AWS account and some experience with the AWS CDK. I’ll be using the TypeScript variant. This article uses CDK version 1.63.0. Let me know if anything breaks in newer versions!
To receive mail with SES you need a domain or subdomain. You can register a domain with Route53 or delegate from another provider. You can also use subdomains like mail-test.bahr.dev to receive mail if you already connected your apex domain (e.g. bahr.dev) with another mailserver.
High-Level Overview
The solution consists of two parts. The email receiver and the api that lets you access the received mail. The first writes to the database, the latter reads from it.
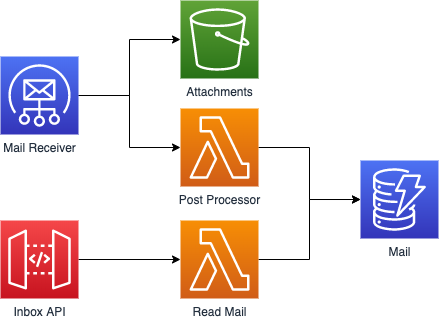
For the email receiver we use SES with Receipt Rules. We use those rules to store the raw payload and attachments in an S3 bucket, and send a nicely formed payload to a Lambda function which creates an entry in the DynamoDB table.
On the API side there’s a single read operation which requires the recipient’s email address. It can be parameterized to reduce the number of emails that will be returned.
Old emails are automatically discarded with DynamoDB’s time to live (TTL) feature, keeping the database small without any maintenance work.
Verify Domain with SES
To receive mail, you must be in control of a domain that you can register with SES. This can also be a subdomain, e.g. if you already use your apex domain (e.g. bahr.dev) for another mailservice like Office 365.
The integration with SES is easiest if you have a hosted zone for your domain in Route53. To use domains from another provider like GoDaddy, I suggest that you set up a nameserver delegation.
Once you have a hosted zone for your domain, go to the Domain Identity Management in SES and verify a new domain. There’s also a short video where I verify a domain with SES.
Data Model
We’ll use DynamoDB’s partition and sort keys to enable two major features: Receiving mail for many aliases and receiving more than one mail for each alias. An alias is the front-part in front-part@domain.com.
partition_key: recipient@address.com
sort_key: timestamp#uuid
ttl: timestamp
By combining a timestamp and a uuid we can sort and filter by the timestamp, while also guaranteeing that no two records will conflict with each other. The TTL helps us to keep the table small, by letting DynamoDB remove old records.
I’m using Jeremy Daly’s dynamodb-toolbox to model my database entities.
import { Table, Entity } from 'dynamodb-toolbox';
import { v4 as uuid } from 'uuid';

// Require AWS SDK and instantiate DocumentClient
import * as DynamoDB from 'aws-sdk/clients/dynamodb';
const DocumentClient = new DynamoDB.DocumentClient();

// Instantiate a table
export const MailTable = new Table({
  // Specify table name (used by DynamoDB)
  name: process.env.TABLE,

  // Define partition and sort keys
  partitionKey: 'pk',
  sortKey: 'sk',

  // Add the DocumentClient
  DocumentClient
});

export const Mail = new Entity({
    name: 'Mail',

    attributes: {
      id: { partitionKey: true }, // recipient address
      sk: {
        hidden: true,
        sortKey: true,
        default: (data: any) => `${data.timestamp}#${uuid()}`
      },
      timestamp: { type: 'string' },
      from: { type: 'string' },
      to: { type: 'string' },
      subject: { type: 'string' },
      ttl: { type: 'number' },
    },

    table: MailTable
  });
The Receiver
SES allows us to set up ReceiptRules which trigger actions when a new mail arrives. There are multiple actions to choose from but we are mostly interested in the Lambda and S3 actions. We use the Lambda action to store details like the recipient, the sender and the subject in a DynamoDB table. With the S3 action we get the raw email deliverd as a file into a bucket. This will be handy to later support more use cases like rerturning the mail’s body and attachments.
Below you can see the abbreviated CDK code to set up the ReceiptRules. Please note that you have to activate the rule set in the AWS console. There is currently no high level CDK construct for this and I don’t want you to accidentally override an existing rule set. Here’s a short video where I activate a rule set.
import * as cdk from '@aws-cdk/core';
import { Bucket } from '@aws-cdk/aws-s3';
import { Table } from '@aws-cdk/aws-dynamodb';
import { Function } from '@aws-cdk/aws-lambda';
import { ReceiptRuleSet } from '@aws-cdk/aws-ses';
import * as actions from '@aws-cdk/aws-ses-actions';

export class InboxApiStack extends cdk.Stack {
  constructor(scope: cdk.Construct, id: string, props?: cdk.StackProps) {
    super(scope, id, props);

    // your-domain.com
    const domain = process.env.INBOX_DOMAIN;

    const rawMailBucket = new Bucket(this, 'RawMail');

    const table = new Table(this, 'TempMailMetadata', {
        ...
    });

    const postProcessFunction = new Function(this, 'PostProcessor', {
        ...
        environment: {
            'TABLE': table.tableName,
        }
    });
    table.grantWriteData(postProcessFunction);

    // after deploying the cdk stack you need to activate this ruleset
    new ReceiptRuleSet(this, 'ReceiverRuleSet', {
      rules: [
        {
          recipients: [domain],
          actions: [
            new actions.S3({
              bucket: rawMailBucket
            }),
            new actions.Lambda({
              function: postProcessFunction
            })
          ],
        }
      ]
    });
  }
}
With the above CDK code in place, let’s take a look at the Lambda function that is triggered when a new mail arrives.
import { SESHandler } from 'aws-lambda';
// the model uses dynamodb-toolbox
import { Mail } from './model';

export const handler: SESHandler = async(event) => {

    for (const record of event.Records) {
        const mail = record.ses.mail;

        const from = mail.source;
        const subject = mail.commonHeaders.subject;
        const timestamp = mail.timestamp;

        const now = new Date();
        // set the ttl as 7 days into the future and
        // strip milliseconds (ddb expects seconds for the ttl)
        const ttl = now.setDate(now.getDate() + 7) / 1000;

        for (const to of mail.destination) {
            await Mail.put({
                id: to, timestamp,
                from, to,
                subject, ttl
            });
        }
    }
}
The function above maps the SES event into one record per recipient and store them together with a TTL attribute in the database. You can find the full source code on GitHub.
Now that we receive mail directly into our database, let’s build an API to access the mail.
The Read API
The Read API consists of an API Gateway and a Lambda function with read access to the DynamoDB table. If you haven’t built such an API before, I recommend that you check out Marcia’s video on how to build serverless APIs.
Below you can see the abbreviated CDK code to set up the API Gateway and Lambda function. You can find the full source code on GitHub.
import * as cdk from '@aws-cdk/core';
import { LambdaRestApi } from '@aws-cdk/aws-apigateway';
import { Table } from '@aws-cdk/aws-dynamodb';

export class InboxApiStack extends cdk.Stack {
  constructor(scope: cdk.Construct, id: string, props?: cdk.StackProps) {
    super(scope, id, props);

    const table = new Table(this, 'TempMailMetadata', {
        ...
    });

    const apiFunction = new Function(this, 'ApiLambda', {
        environment: {
            'TABLE': table.tableName,
        }
    });
    table.grantReadData(apiFunction);

    new LambdaRestApi(this, 'InboxApi', {
      handler: apiFunction,
    });
  }
}
API Gateway is able to directly integrate with DynamoDB, but to continue using the database model I built with dynamodb-toolbox I have to go through a Lambda function. I also feel more comfortable writing TypeScript than Apache Velocity Templates.
With the lambda function below, we load mails for a particular recipient and can filter to only return mails that arrived after a given timestamp.
import { APIGatewayProxyHandler } from 'aws-lambda';
// the model uses dynamodb-toolbox
import { Mail } from './model';

export const handler: APIGatewayProxyHandler = async(event) => {
    const queryParams = event.queryStringParameters;
    const recipient = queryParams?.recipient;
    if (!recipient) {
        return {
            statusCode: 400,
            body: 'Missing query parameter: recipient'
        }
    }
    const since = queryParams.since || '';
    const limit = +queryParams.limit || 1;

    const mails = (await Mail.query(
        recipient,
        {
            beginsWith: since,
            limit,
        }
    )).Items;

    return {
        statusCode: 200,
        body: JSON.stringify(mails)
    }
}
After deploying the read API, you can run a GET request which includes the recipient mail as the recipient query parameter. You can further tweak your calls by providing a since timestamp or a limit that is great than the default 1.
For example if you are sending an order confirmation to random-uuid@inbox-api.domain.com, then you need to run GET request against https://YOUR_API_ENDPOINT/?recipient=random-uuid@inbox-api.domain.com.
Limitations and Potential Improvements
While the SES sandbox restricts how many emails you can send, there seems to be no limiation about receiving mail.
Our solution is not yet capable of providing attachments or the mail body. The SES S3 action already stores those in a bucket which can be used for an improved read API function.
We could also drop the Lambda function that ties together the API Gateway and DynamoDB, by replacing it with a direct integration between the two services.
Try it Yourself
Check out the source code on GitHub. There’s a step by step guide for you to try out this solution.
Do you need help? Send me a message on Twitter or via mail!
Further Reading
- Source code on GitHub
- Receipt Rules
- Test email edge cases with the AWS mailbox simulator
- DynamoDB TTL
Enjoyed this article? I publish a new article every month. Connect with me on Twitter and sign up for new articles to your inbox!