
How to get started with OrgFormation
07 Feb 2022Update: Since the release of this article, AWS released an API to close accounts.
In a recent article Corey Quinn told us about the AWS service he hates the most: Isengard. This is because AWS is giving its engineers a great tool to manage accounts, but doesn’t offer it to the rest of us. As a former AWS engineer turned customer again, I miss the simplicity and the features it gave me.
With the experience of managing many accounts in Isengard I set out to get something similar for my own AWS projects.
There are AWS services such as Organizations, SSO, and Control Tower. As someone who never had to worry about those, it may be hard to put the pieces together in a way that works. I want to build fun side projects, and not figure out how to connect all the pieces.
Understanding all the services and concepts needed to setup a secure #AWS landing zone can be hard. After chatting to @theburningmonk and following a great article by @bahrdev, I decided to explore this using #orgformation, an #opensource tool by @OConijn
— Matt Lewis (@m_lewis) March 23, 2022
Furthermore, I read that AWS Control Tower is not where it should be. I did not carefully read through the Control Tower features/documentation though.
AWS Control Tower is improving but it’s still painful, as well as not generally recommended for enterprises at large scale.
[AWS Control Tower] only has limited facilities when it comes to updating and maintaining these resources
That’s when I stumbled upon AWS Organization Formation (OrgFormation) by Olaf Conijn.
1. Prerequisites
This article assumes that you have some experience working with the AWS console and Git.
You should also know how to create IAM users and how to get the credentials into a profile on your local machine.
2. What is OrgFormation?
OrgFormation is a community driven Infrastructure as Code (IaC) tool for managing AWS Organizations. It’s open source on GitHub and available on NPM. With IaC you reduce the friction that engineers experience when creating new accounts. You can also set up rules and guidelines for your whole AWS organization.
OrgFormation has many features, like restricting unused regions and large EC2 instances, offering a nice login experience with AWS SSO, and managing service quotas via code.
In this article we will set up an OrgFormation CI/CD pipeline. It will help us with creating accounts, setting up billing alerts, and using AWS SSO to sign in to accounts.
3. Why should you use OrgFormation?
OrgFormation is a big deal because I can automate the setup. No more tedious manual steps where I might forget to do things correctly here and there. There are still some manual steps with AWS SSO, but nothing around account management.
Furthermore, OrgFormation can also configure AWS SSO for you, and add new accounts to the SSO landing page. As you can see below I can configure various roles for accounts, and am able to use a limited scope of permissions to get my job done.
My personal organization currently holds 14 accounts. Adding a new one only takes 10-20 minutes, of which 80% is the pipeline running. Perfect to take a short walk, or have a coffee.
You can install OrgFormation on your local machine and update your organization from there, but an even better option is to set up a pipeline. Everytime you push a change, the pipeline will apply changes in a consistent manner.
4. Getting Started with the OrgFormation Pipeline
CI/CD support is a hidden gem of OrgFormation that is only mentioned in a side note. It should be the main way you use OrgFormation!
Not only are your changes under version control, but each change that you push to the main branch is automatically applied to the specified accounts. New accounts will get created, changed permissions are applied, and so on.
4.1 Start with a Test Organization!
Deleting AWS organizations and accounts is not as easy as deleting a production database. When I started using OrgFormation, I made a bunch of mistakes along the way. Those put the organization and new accounts into a state where I’d rather delete them all and start over. You need to wait at least 7 days after creating an account before you can suspend it. After that you have to wait another 90 days until AWS fully removes the account.
Once you know what you want and how things work, create a long term management account with a long term organization. Discard the test account and organization you used to learn how things work. I will explain the steps and timeline of removing accounts in a future article.
With that warning out of the way, let’s go over the first steps to set up the pipeline.
4.2 Management Account without AWS organization
You need an AWS management account which will own the organization. We will also put the OrgFormation repository and pipeline into the management account.
This account must not have an AWS organization yet. If your account already has one, and maybe even some accounts in the organization, I recommend that you create a new AWS account. There are some pitfalls around not being able to integrate existing accounts into the new organization, that I don’t want to trouble you with. I don’t think I fully understand them either. You can still try, but I suggest you take the easy route with an account that doesn’t have an AWS organization yet.
Side note: To speed things up later, go to the Cost Explorer and click on “Launch Cost Explorer”. By the time we get to the Budget Alerts, the cost explorer may be ready for you.
4.3 Install the OrgFormation CLI on your local machine
To initialize a pipeline we first need to install the OrgFormation CLI with NPM: npm install -g aws-organization-formation
We will assume that you already have a management account that will own the organization. If possible, use a fresh account. That will remove a lot of problems with existing resources.
Please create an Administrator user in IAM
and attach the AdministratorAccess policy.
Once you’ve done that you can put the credentials into your ~/.aws/credentials file.
If you specify a profile different from default, you will need to use the environment variable AWS_PROFILE in the next step.
It would be better to create an IAM role with only the required permissions, but that’s out of scope for this article. If you have one ready, I’d be happy to include it here.
4.4 Set up CodeCommit and CodePipeline
OrgFormation requires that you manually create an AWS Organization. To do so, go to the AWS Organizations service and click on “Create Organization”. You’ll get a verification mail that you need to confirm.
After installing the OrgFormation CLI, run org-formation init-pipeline --region <YOUR-REGION> to create a CodeCommit repository and a CodePipeline.
This command will use the default profile, or whatever profile you specify via AWS_PROFILE.
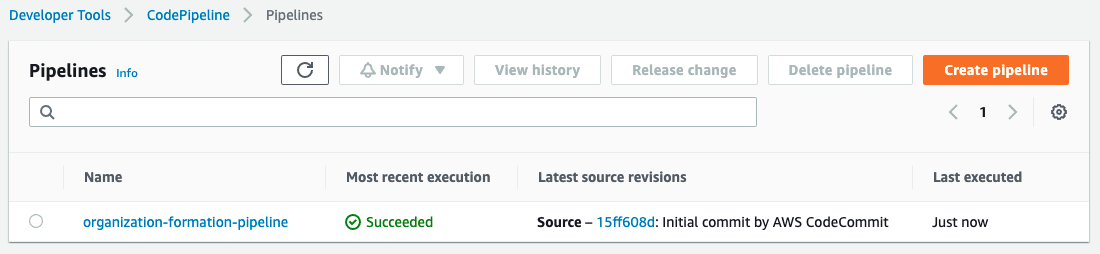
Once the command completes, you will see a new repository in CodeCommit and a new pipeline in CodePipeline.
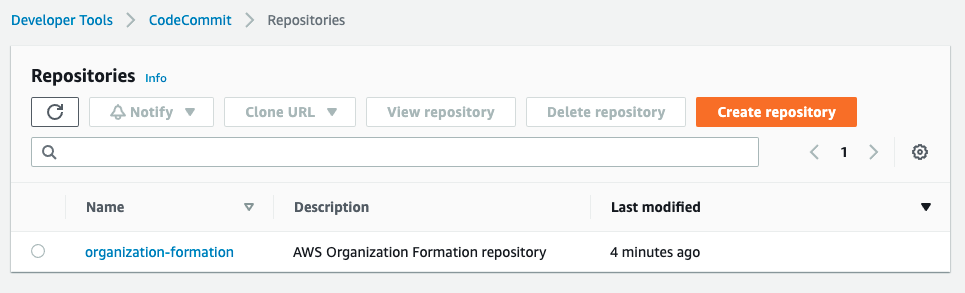
When you navigate to CodePipeline you will see that the pipeline has started with the initial commit. If you want to rerun a CodePipeline, you have to select it and click on the “Release Change” button.
Once that’s ready, you can delete the Administrator user. All future changes to the organization will go through CodePipeline.
Let’s check out the code from your new repository next!
4.5 Check out the initial code
To clone from CodeCommit you need a repository URL that follows the format below:
codecommit::<REGION>://<AWS_PROFILE>@<REPO_NAME>
When you clone with a given profile, that one will be used to push future changes. Start by creating an IAM user with the managed policy AWSCodeCommitPowerUser. You can later update this IAM user with a refined policy.
Let’s call the IAM user awsorg-codecommit, and put its credentials in our ~/.aws/credentials file.
With the IAM role prepared, and our repository located in us-east-1, we can finally check out the code with the following command:
git clone codecommit::us-east-1://awsorg-codecommit@organization-formation
Have a look at the code and familiarize yourself with the structure of the configuration. In the next step we will add a new account to the organization.
5. Getting started with Managing Accounts through OrgFormation
AWS requires each account to have a unique e-mail address. Some webmail providers like gmail or hotmail allow you to add a + into your address. If your address is michael@gmail.com, then mail to michael+1@gmail.com will also arrive in your inbox.
5.1 Add your first account
In the file organization.yml you should see a section Organization that has a MasterAccount and an OrganizationRoot.
Into the Organization config we now add a new account, called TestAccount1.
Organization:

 # ...

 TestAccount1:
   Type: OC::ORG::Account
   Properties:
     Alias: test-account-1
     AccountName: Test Account 1
     RootEmail: michael+test-account-1@gmail.com
Knowing that we’ll do some trial and error, we’ll also create organizational units (OU) for active and suspended accounts. OUs allow us to group accounts, and apply common properties to all accounts in a unit.
Organization:

  # ...

  TestAccount1:
    Type: OC::ORG::Account
    Properties:
      Alias: test-account-1-78G8F7G
      AccountName: Test Account 1
      RootEmail: michael+test-account-1@gmail.com

  ActiveOU:
    Type: OC::ORG::OrganizationalUnit
    Properties:
      OrganizationalUnitName: active
      Accounts:
        - !Ref TestAccount1
 SuspendedOU:
   Type: OC::ORG::OrganizationalUnit
   Properties:
     OrganizationalUnitName: suspended
     Accounts: []
What’s the 78G8F7G about? The account alias must be globally unique, just like S3 bucket names. That’s why I’m adding some random characters which hopefully no one else uses yet.
Side note: At this stage you should be able to omit the account alias, and still get things to work. There are however parts of the OrgFormation ecosystem, which require the alias.
An example here is the NoDefaultVpcRp type, where it fails if the alias is missing.
Commit, push, and let the pipeline apply the changes. Once the pipeline has finished, go to AWS Organizations.
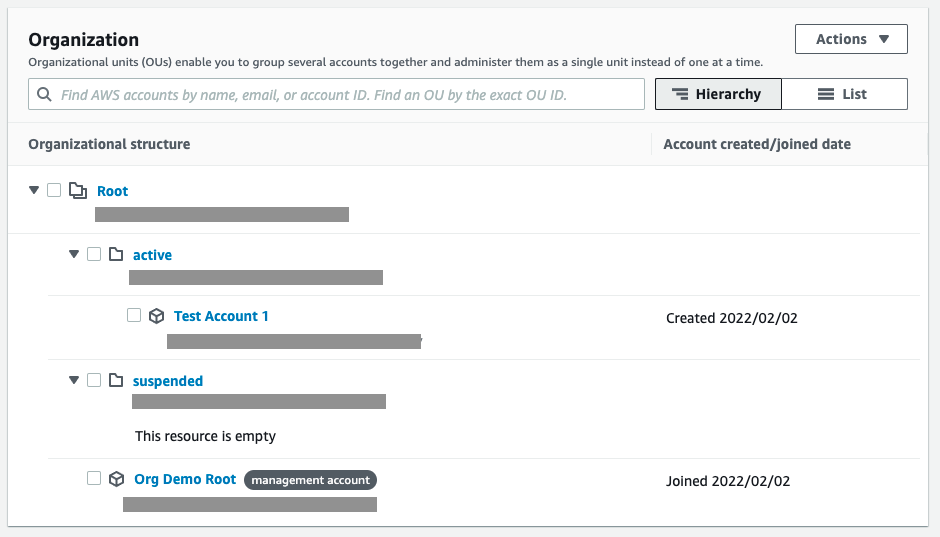
Here you can see one active account in your active OU as well as an empty suspended OU.
Did you mess something up along the way and want to start with a new account? Move the !Ref TestAccount1 into the SuspendedOU,
and keep the TestAccount1 in the organization.yml file. Deleting accounts is a bit more tedious, and we’ll cover that process in a future article.
5.2 Create a Budget Alert Task
We don’t want any billing surprises, so in the next step we set up budget alerts for our accounts. In this section we will learn how to create an OrgFormation task that sets up a billing alert and an email subscription.
OrgFormation has already created a folder called 000-organization-build. The recommended way to structure tasks is with a number prefix,
and some space between numbers. By prefix tasks with 000, 010, and so on, we can later add in new tasks.
OrgFormation will notice new tasks, but won’t have to care about existing tasks changing their name.
We are now going to create a folder 040-budgets with a _tasks.yml and a budgets.yml file.
I’ve uploaded the tasks
and budgets file for you on GitHub.
You’re free to pick any numeric prefix other than 040.
Have a look at the OrgFormation reference templates to
see what you might add in the future.
There is a lot going on in the budgets.yml file. The gist of it is that you’ll get a budget notification in one of the following three cases:
- Actual spending is greater than 80% of the threshold.
- Forecasted spending is 100% of the threshold.
- Actual spending is greater than 100% of the threshold.
Budget alerts only work with USD.
If you want more information about the resources in the budgets.yml file, you can google e.g. for “CloudFormation AWS::SNS::Topic” which
will lead you to the CloudFormation documentation. All the resources in this file are AWS CloudFormation resources.
Your folder structure should now look like this:
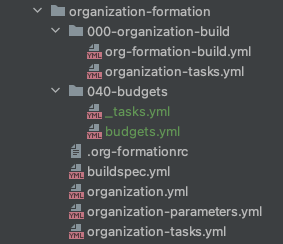
Now open the file organization-tasks.yml and add the Budgets task.
OrganizationBuild:
 Type: include
 Path: ./000-organization-build/organization-tasks.yml

Budgets:
 Type: include
 DependsOn: [ OrganizationBuild ]
 Path: ./040-budgets/_tasks.yml
From now on the pipeline will execute the budget alerts task for all accounts with the tag budget-alarm-threshold. We will update our accounts in the next section.
Commit, push, and let the pipeline run. It should not break anything because this new task doesn’t apply anywhere yet. But it’s better to find problems early, and your pipeline should only take 1-2 minutes at this point anyway.
5.3 Budget Alerts
With OrgFormation you can specify tags as account properties.
With the tags budget-alarm-threshold and budget-alarm-threshold-email-recipient we give OrgFormation the right information for the budget alerts task.
Unfortunately the pipeline will currently fail when you apply a budget alert to an account. Unless you did this before, you now need to go to the AWS console of the management account, and launch the Cost Explorer. It will take a bit of time for the Cost Explorer to be ready. In my case it was ready after less than 1 hour. Until then, you may see a budget related error in the pipeline. If you’re impatient, just rerun it every 10 minutes, no matter what the Cost Explorer UI says. Check out the troubleshooting section at the end of this article.
An empty account should not do much, so I’ll go with a threshold 5 USD here. I will also use a dedicated email for billing alerts, so I can better separate them from the AWS marketing mails.
Organization:

  # ...

  TestAccount1:
   Type: OC::ORG::Account
   Properties:
     Alias: test-account-1-u8a8sgsy
     AccountName: Test Account 1
     RootEmail: michael+test-account-1@gmail.com
     Tags:
       budget-alarm-threshold: 5
       budget-alarm-threshold-email-recipient: michael+billing-alerts@gmail.com
Like in the previous step commit, push, and let the pipeline apply the changes. Once the pipeline has finished, you will receive an email with a verification link for the budget alert. Click it, or you won’t get budget alerts for that account. If your pipeline fails, check out the troubleshooting section at the end of this article.
To see the budget alert in the AWS console, we need to log in to the TestAccount1. This is a good time to set up AWS SSO to get a great login experience, rather than trying to go through the standard AWS login.
5.4 Test with existing and fresh accounts
I sometimes stumbled over problems where a task worked with existing accounts, but not with new once, or vice versa. I can’t answer why yet, but want to show you how you can identify problems before your config grows too large.
In the above step we added the budget alerts to an existing account. The account already exists because we earlier pushed the code and let CodePipeline create the account for us. So we’ve covered the “existing account” part.
To test that his works with a new account as well, you can create a new account and give it the budget alert tags immediately.
Commit, push, and let the pipeline apply the changes. If the pipeline doesn’t break, you should be good to continue. You can always move accounts to the suspended OU. Keep in mind that deleting accounts is rather tedious.
5.5 Register Custom Type for AWS SSO
The step to set up AWS SSO requires custom OrgFormation types. These are similar to CloudFormation types, but maintained by the OrgFormation contributors. We will need a custom type to assign groups to accounts, e.g. for giving developers access to dev accounts.
Create a folder with the name 005-types, and create a _tasks.yml file in there. Copy and paste this config.
Now go to the file organization-tasks.yml and add the new task between the OrganizationBuild and the Budets config.
This instructs OrgFormation to register the custom type, so we can use it in the SSO setup later.
# ...

Types:
 Type: include
 DependsOn: OrganizationBuild
 Path: ./005-types/_tasks.yml

# ...
Don’t forget to commit, push and let the pipeline succeed.
5.6 Setup AWS SSO
Now that we can create accounts, and have billing alerts in place, we will set up AWS SSO to get a nice sign-in experience. With SSO we only have to sign in once, and then can pick the right role to federate into accounts with. This feels very similar to how Isengard works. It is incredibly helpful when you have many accounts, and want to use groups to grant access.
The first step is to manually enable AWS SSO through the UI. Sign in to your management account, and navigate to the AWS Single Sign-On (SSO) service. In the middle of your screen you will see a button “Enable AWS SSO”. Click that, and wait for the process to complete. If it fails because of rate limiting, then wait a few seconds, refresh the page, and try again.
Now we’re going to collect a couple parameters that we will need for the SSO OrgFormation task. First navigate to Settings via the lefthand navigation. Copy the SSO ARN into your notes. Also copy the User portal URL to your notes.
The next step is to manually create the two groups “Developer” and “Admin”. Navigate to Groups and create two groups as shown below.
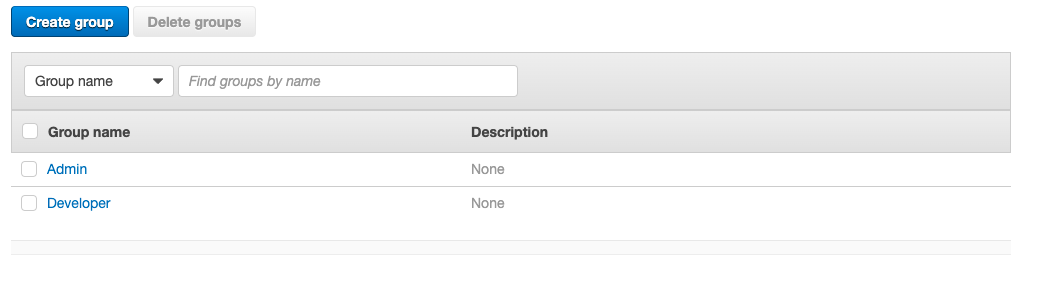
For each group, open its details and copy the Group ID to your notes.
With that information ready, we’re now going to create new tasks for SSO.
This time we create the folder 100-sso. Again, I’ve uploaded the files _tasks.yml
and aws-sso.yml which you should put into the 100-sso folder.
In the _tasks.yml file there are some values for you to replace (search for replace-me).
Here you fill in the SSO ARN, as well as the Group IDs for the Admin and Developer group.
The SSO task will grant Administrators access to all accounts. Developers get access to accounts in the Organizational Unit ActiveOU.
For your organization you can adapt this to team specific OUs, e.g. TeamSearchDevOU and TeamSearchProdOU.
Once you’ve created the SSO tasks, go to the file organization-tasks.yml and add the SSO task at the end.
# ...

Sso:
 Type: include
 DependsOn: [ OrganizationBuild, Types ]
 Path: ./100-sso/_tasks.yml
Commit, push, and let the pipeline run.
Once complete, you can go to AWS SSO, and navigate to AWS accounts via the lefthand navigation. Here you should see your accounts with permission sets. The management account should only have Administrator, while accounts from the ActiveOU should also have Developer.
5.7 Create an AWS SSO User
Now we’re going to create a user to complete the AWS SSO setup.
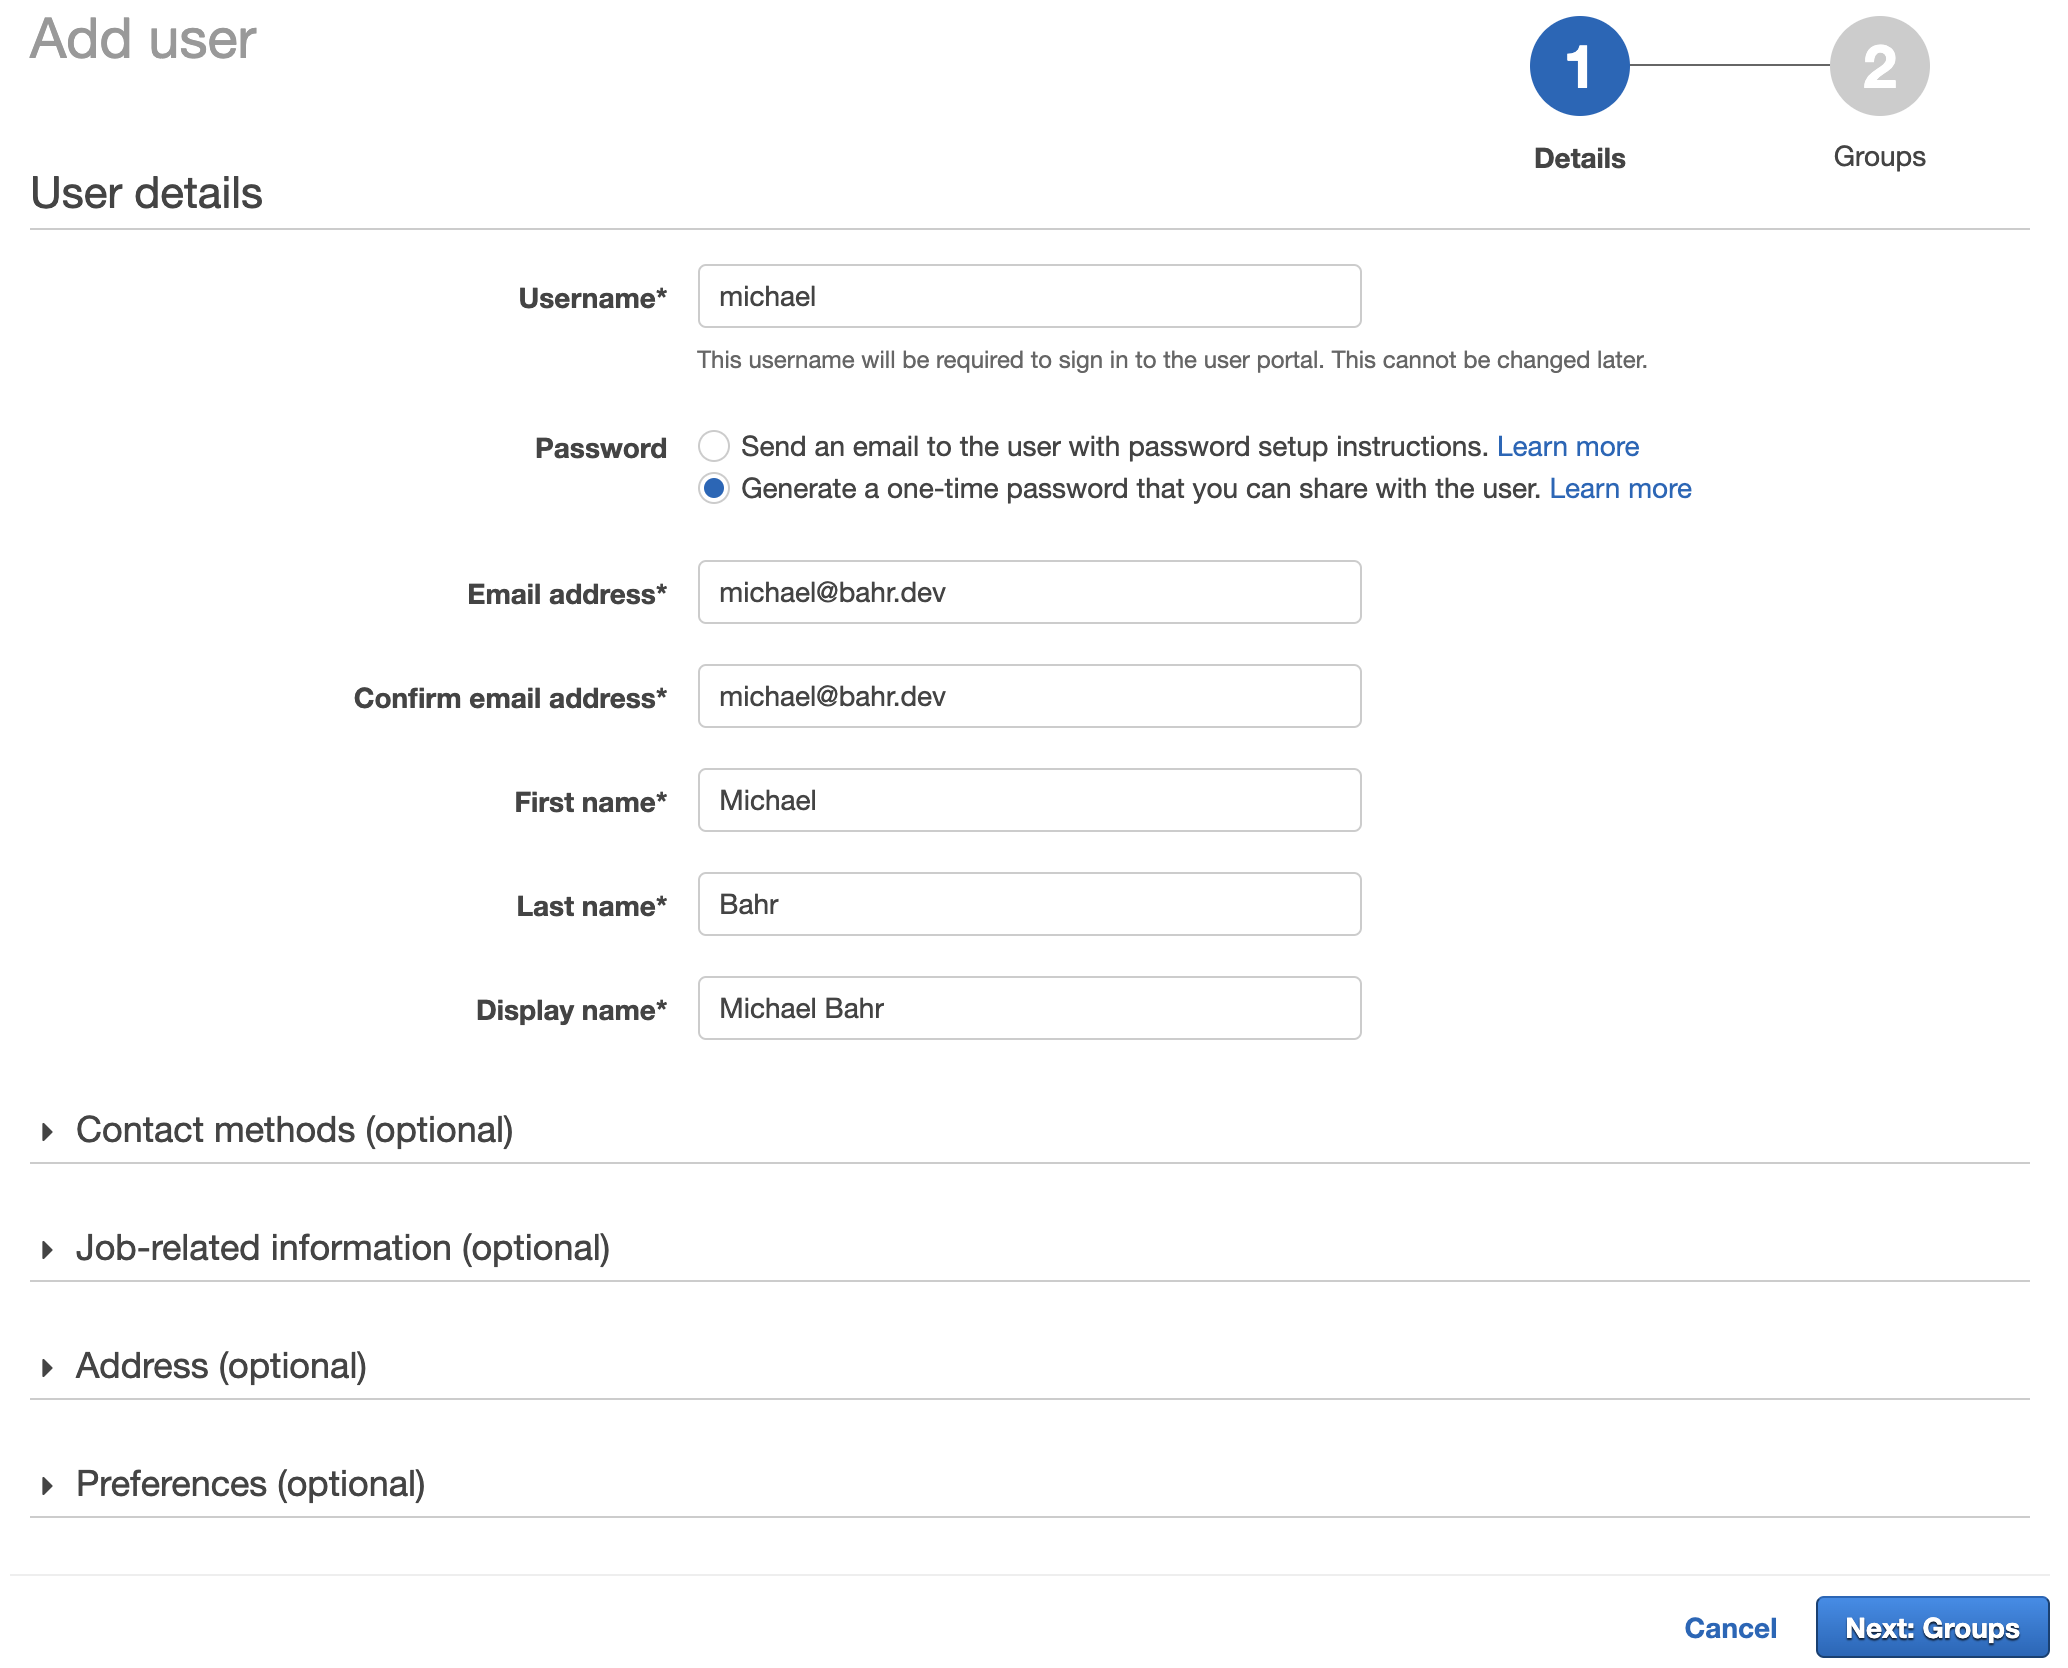
This is again a manual step through the AWS SSO console. Navigate to Users, and add a user. Fill in the details and click on “Next: Groups”.
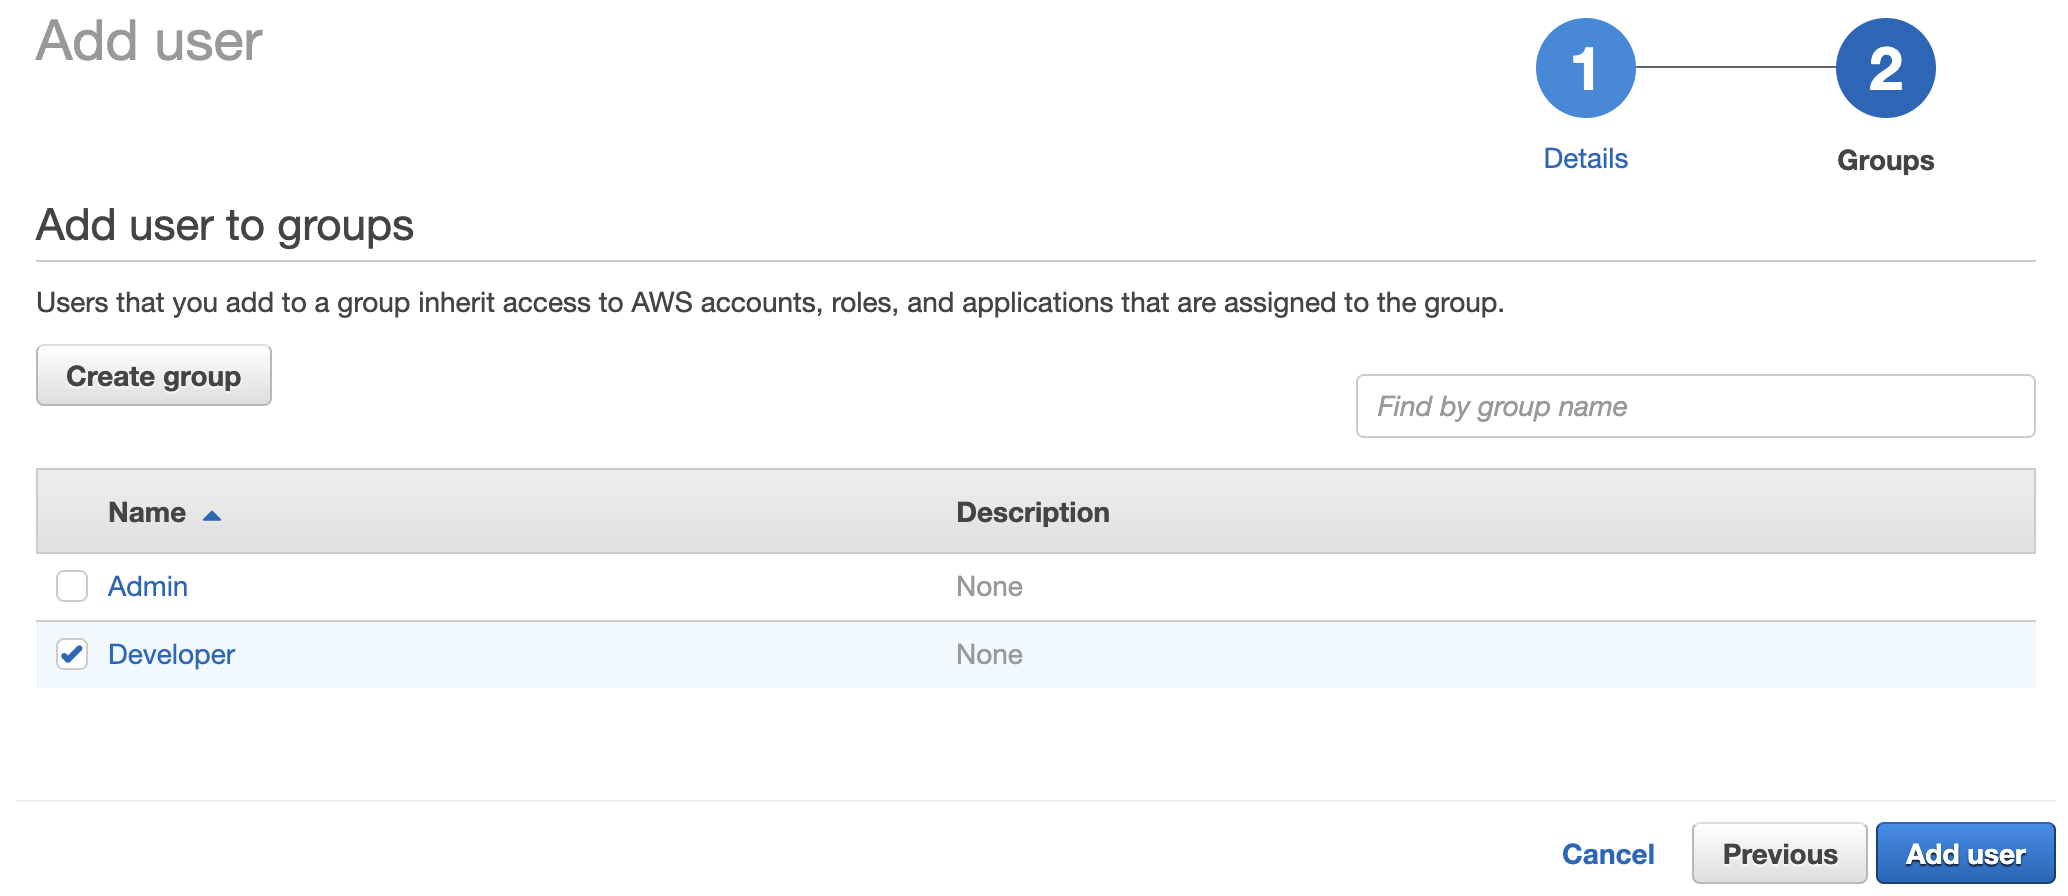
In the next step assign one or more groups. I’m going with only Developer for now.
You can now follow the link to the user portal, and use the One-time password to sign in. You will be asked to create a new password.
Once you signed in you will see the following landing page. Here you can choose an account, and a role that’s available you. You can then either sign in to the management console, or get programmatic credentials.
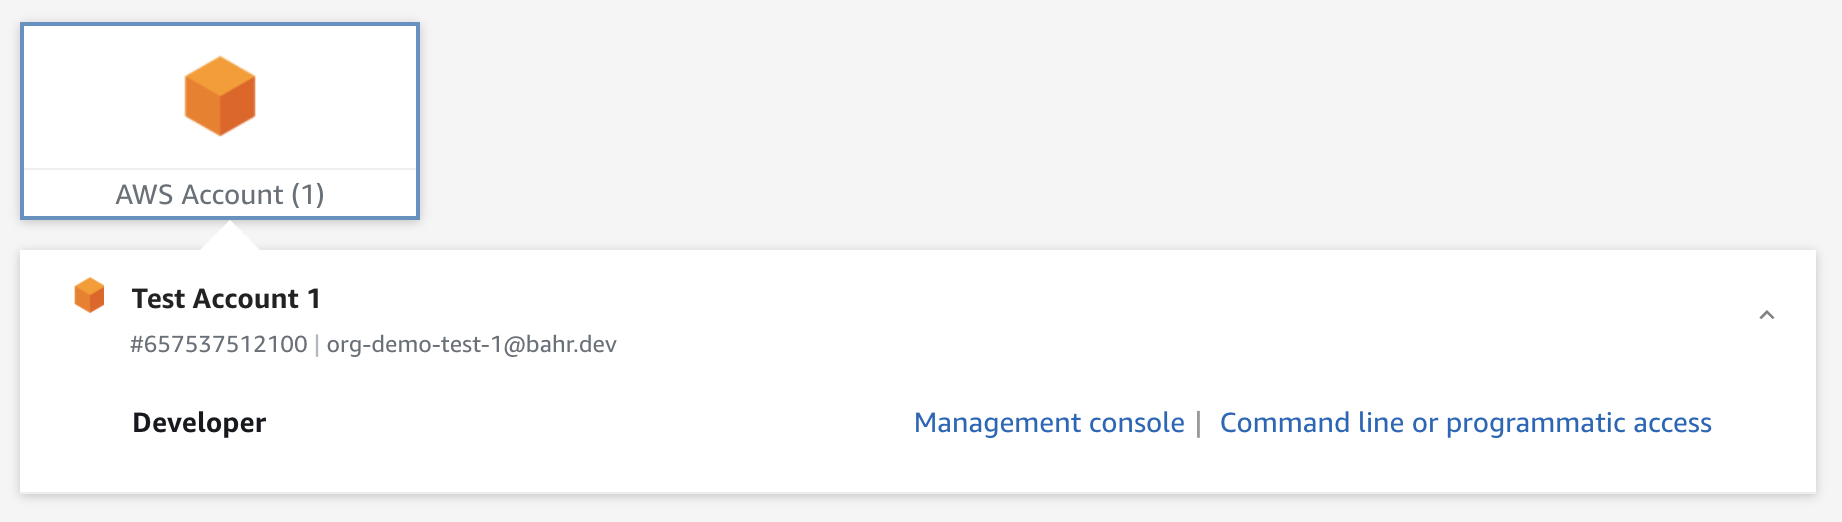
Note how we don’t see the management account here, because we don’t have access to it. Following our setup only Administrators can access the management account.
Congratulations to setting up your AWS organization, accounts with tasks, and the SSO landing page!
Below you can find some troubleshooting for problems you may encounter along the way. There are also some resources for further reading.
6. Raise Your Account Service Limit
By default, you can have up to 10 accounts in your organization. Request a service limit increase early, so that you don’t get stuck waiting multiple days for AWS support to take care of your request.
7. Next Steps
There’s a lot that OrgFormation can help you with. Check out the templates of the OrgFormation reference repository!
For example, you can deny large EC2 instances, or send a notification when a new account is created.
8. Troubleshooting
Cannot read property ‘region’ of undefined
Pass the region like this: org-formation init-pipeline --region us-east-1
ERROR: init-pipeline command must be ran from organization master account
You need to sign in to the main account, go to AWS Organizations and click on “Create Organization”. You will also get a verification link via mail that you should confirm.
ERROR: failed executing task: Create OC::ORG::Account TestAccount1 Error: The account alias test-account-1 already exists. Most likely someone else already registered this alias to some other account.
It appears that account aliases must be globally unique, just like S3 bucket names. Add some random identifier to get rid of this error.
ERROR: Resource Budget failed because Account
is a linked account. To enable budgets for your account, ask the payer account to enable budgets first.
You need to launch the Cost Explorer. This may take up to 24 hours, but in my case it was ready after about an hour. Unfortunately you need to wait here for AWS to be ready.
ERROR: Resource EmailSubscription failed because Invalid parameter: Email address
The email is invalid. In my case I had two @ in it.
Enabling AWS SSO fails with “Your request has a problem. Please see the following details. Rate exceeded Please contact support.”
No idea why SSO has such a low rate that the first attempt fails. I waited a few seconds, refreshed the page and clicked on “Finish setup”. Didn’t have further problems from there.
I can’t move a former management account to my new organization.
You have to delete the old organization first. Otherwise, the invite isn’t visible in the invited account. Contributed by Wojtek Gawroński.
9. Resources
- Managing AWS Organizations using the open source org-formation tool — Part 1
- Series: Setting up a multi-account AWS environment and Adding AWS SSO and controlling permissions
- OrgFormation Slack
- Off to a great start with AWS Organizations
- Hear about org-formation in Real-World Serverless podcast #5
- See org-formation in Mastering AWS Organizations with Infrastructure-As-Code
- Corey Quinn’s article about Isengard
Enjoyed this article? I publish a new article every month. Connect with me on Twitter and sign up for new articles to your inbox!