
How To Download Data With AWS Step Functions
04 Feb 2021In this article I introduce the Step Functions Downloader Pattern, which is a serverless approach to retrieving and storing data from 3rd party APIs with as little custom code (read: Lambda functions) as possible. By using AWS Step Functions you can parallelize requests and get orchestration capabilities for your downloading and post-processing.
We can add in Lambda functions when we need to prepare more complex requests (e.g. for paginated requests), but simple GET requests can run completely functionless.
In this article you’ll find a simple example as well as some limitations of the Step Functions Downloader Pattern. We’ll take a look at an example with parallel requests and post-processing in a followup article.
Are you interested in CDK code to spin up a Step Functions Downloader? Let me know on Twitter!
Prerequisites
Previous experience with AWS Step Functions is helpful, but not required. Check out Alex Hyett’s Getting Started with AWS Step Functions.
Knowledge about API Gateway, DynamoDB and Lambda helps you with debugging edge cases.
What is the Downloader Pattern?
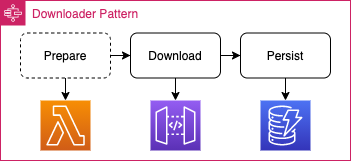
At its core the Downloader Pattern consists of the three steps Prepare, Download and Persist which allow us to collect 3rd party data into a DynamoDB table.
In the optional Prepare step, we build the URLs and attach required headers if needed. If there’s only one static
endpoint that you read from (e.g. GET https://esi.evetech.net/v2/status), then you don’t need the preparation step.
Please note that you need a workaround for endpoints that require Authorization headers.
During the Download step we run GET requests against the URL that we received from the previous step, and can
optionally transform the result with ResultSelectors and JSONPath.
Finally, we map the data to our DynamoDB format and persist it. You can also use a different data storage as longs as it is listed on the Step Functions service integrations or is accessible via HTTP. At the time of writing S3 is not listed on the service integrations page.
An experienced Step Functions user might notice that in principle we only need the Download step and can change/omit the other steps as needed. In our first example, we will focus on the core use case of getting 3rd party data into a DynamoDB table. The second example will help you get started with more complex use cases.
Standard or Express Workflows?
Step Functions come in two flavors: Standard and Express. Standard charges for the number of transitions between states, and Express charges for how often and how long your state machines run. I suggest to use Standard for complex use cases like approval flows with human interaction, and Express for straight-forward processes that can safely complete within 5 minutes. Express Workflows tend to be cheaper for state machines that run frequently. Check the pricing page for more details.
Standard is very helpful when you write and debug the state machine. It gives you a lot of insight about where and why things fail, as well as the data that is passed from one state to another. All this is shown in a nice UI. You get the same information with Express, but will have to read through the logs and connect the dots yourself. Develop the state machine with Standard, and then recreate it with Express when you move to production.
The Downloader Pattern only uses features that both Standard and Express Workflows can use.
Invocation and Post-Processing
AWS Step Functions supports are variety of triggers and service integrations. You can see some of their icons in the picture below. Also note that in this picture I split the Persist step into a “Transform Result” and “Post-Process”, as we might want to aggregate our data don’t necessarily need to store it in DynamoDB.

We can start a Step Function Execution based on API Gateway calls, Lambda invocations or a simple Cron Job from CloudWatch.
Once we downloaded the data, we have even more options to choose from for post-processing the data. We only talked about DynamoDB in previous sections, but you can also send the data to many other services such as Lambda, SQS, SNS, API Gateway, SageMaker and even other Step Functions.
A Simple Example
The 3rd party API we use for this example comes from EVE Online, a space based multiplayer game that features an extensive API. Part of this API is the number of currently logged in players.
The result of this example will be a DynamoDB table that we can use to build player count charts with a minute-precision. You can find an example of how these charts could look like at eve-offline.net.
Below you see an abbreviated Step Functions definition, that has two tasks. We’ll dive into each of them in the next sections.
{
  "StartAt": "Get player count",
  "States": {
    "Get player count": {
      "Type": "Task",
      "Resource": "arn:aws:states:::apigateway:invoke",
      "Parameters": { ... },
      "Next": "Store player count"
    },
    "Store player count": {
      "Type": "Task",
      "Resource": "arn:aws:states:::dynamodb:putItem",
      "Parameters": { ... },
      "End": true
    }
  }
}
Notice how there’s no Lambda or other compute involved. I like this, because we write and maintain less code, and use more managed services. We need to learn about Amazon States Language though, and write the according state machine definition. This might not sound like a big win if you are already familiar with writing Lambda functions, but it gets more interesting when we look at operational effort, safeguards and testing in your code. Have a look at the features that AWS Step Functions provides.
From the example above you might notice that this requires an API Gateway, a DynamoDB table, and a Cron Job to trigger an execution every minute. Let’s set that up.
1. API Gateway Proxy For 3rd Party API
AWS Step Functions can’t directly call 3rd party APIs, but it can send a request to an API Gateway acting as a proxy for the 3rd party API.
To set up an API Gateway Proxy you first need the 3rd party endpoint. For requests going to https://esi.evetech.net/v2/status
this would be https://esi.evetech.net. The proxy will append the path parameters which we pass in from the state machine.
Head over to the AWS Management Console and create a new REST API. In theory this should also work with AWS HTTP APIs.
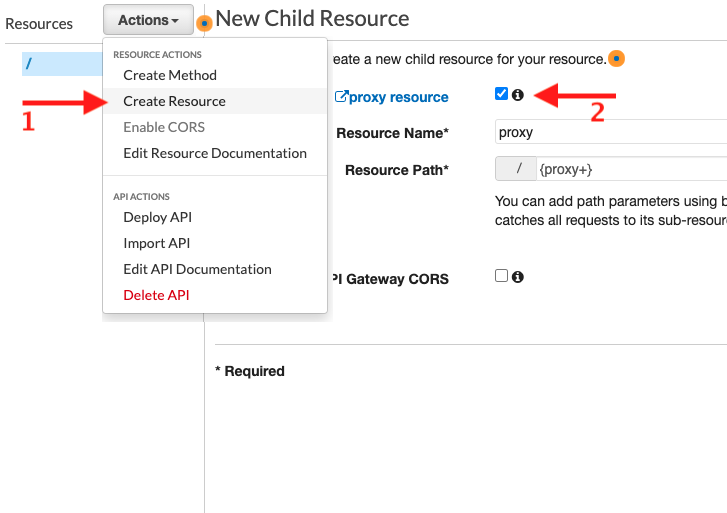
Once you created the API, create a new resource and configure it as a proxy resource.
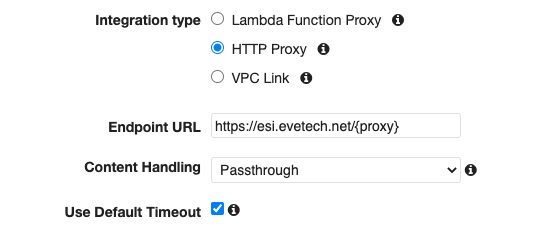
For the integration type, select HTTP Proxy and enter the domain of the 3rd party API. Append {proxy} to the endpoint so that API Gateway knows how to proxy the path and query parameters.
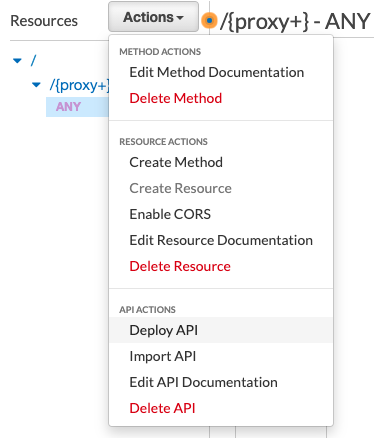
Finally, deploy your API. From the Actions’ dropdown select Deploy API, give it a stage name like dev or prod and click on Deploy API.
Copy the API I from the “Invoke URL” that you see in the top for the next steps. For
https://1234567890.execute-api.us-east-1.amazonaws.com/prod this would be 1234567890.
That’s it. To verify that everything works as expected, you can test an API call through the API Gateway console.
2. DynamoDB Table
Now head over to the DynamoDB console and create a new table. For this example we’ll call it PlayerCountTable, give it the partition key pk as a String, and omit the sort key.
I also suggest that you customize the settings and select On-demand as the capacity mode. That way you don’t pay if your table is not in use. Keep an eye on your spending if you download a lot of data.
DynamoDB will take a few moments to create the table. In the meantime you can continue with the next step.
3. Step Functions
Next let’s go to the Step Functions console. Here we create a new state machine with the type Standard. We can later recreate this with Express for higher concurrency, but Standard makes developing state machines through the console easier.
Here you can paste the example state machine definition you see below. Replace the xxxxxxxxxx in the Download step
with the ID of your API Gateway. If you deployed to a region different from us-east-1 then also update the region.
{
  "StartAt": "Get player count",
  "States": {
    "Get player count": {
      "Type": "Task",
      "Resource": "arn:aws:states:::apigateway:invoke",
      "Parameters": {
        "ApiEndpoint": "xxxxxxxxxx.execute-api.us-east-1.amazonaws.com",
        "Stage": "prod",
        "Method": "GET",
        "Path": "/v2/status"
      },
      "Next": "Store player count"
    },
    "Store player count": {
      "Type": "Task",
      "Resource": "arn:aws:states:::dynamodb:putItem",
      "Parameters": {
        "TableName": "PlayerCountTable",
        "Item": {
          "pk": {
            "S.$": "$.Headers.Date[0]"
          },
          "count": {
            "N.$": "States.Format($.ResponseBody.players)"
          }
        }
      },
      "End": true
    }
  }
}
Next create the state machine with the console defaults. In my tests it took up to a minute for the policies to be applied so that the state machine could invoke API Gateway. During that time you might see an exception about service principals.
Let’s look at what each step does in detail before running the first execution.
3.1 Invoke API Gateway
The first step calls our API Gateway, and returns the HTTP response with headers, response body and status information.
"Get player count": {
  "Type": "Task",
  "Resource": "arn:aws:states:::apigateway:invoke",
  "Parameters": {
    "ApiEndpoint": "xxxxxxxxxx.execute-api.us-east-1.amazonaws.com",
    "Stage": "prod",
    "Method": "GET",
    "Path": "/v2/status"
  },
  "Next": "Store player count"
}
For our example we set the Stage to prod, the Method to GET, and the Path to /v2/status.
Because we set the endpoint in our API Gateway proxy to https://esi.evetech.net/{proxy}, this request will be proxied
to GET https://esi.evetech.net/v2/status. You can try that endpoint in your browser.
You can customize the API call with query parameters, headers, request bodies and much more.
This is relatively easy when you have static values, but becomes tricky with Dynamic Parallelism. More about that in the
second article. Some headers such as Authorization are not permitted due to security considerations,
but that can be worked around.
Inspecting the output of this step in the console shows us the following response.
{
  "Headers": {
    "Date": [
      "Wed, 09 Dec 2020 15:47:44 GMT"
    ],
    ...
 },
  "ResponseBody": {
    "players": 24449,
    ...
  },
  "StatusCode": 200,
  "StatusText": "OK"
}
This output will be the input for the next step. Please note that the output of each step must be less than 256 KB.
3.2 Store It In DynamoDB
In this step, we send a putItem request to DynamoDB and pass along the Date from the Header, as well as the players count from the ResponseBody.
"Store player count": {
  "Type": "Task",
  "Resource": "arn:aws:states:::dynamodb:putItem",
  "Parameters": {
    "TableName": "PlayerCountTable",
    "Item": {
      "pk": {
        "S.$": "$.Headers.Date[0]"
      },
      "count": {
        "N.$": "States.Format($.ResponseBody.players)"
      }
    }
  },
  "End": true
}
We need to wrap the player count in a States.Format, because DynamoDB doesn’t allow numbers as values, but rather
expects { "N": "123" } for the number 123. Read more about DynamoDB data types in the DynamoDB Guide by Alex DeBrie.
If you let Step Functions create its own role, it will also attach the required permission to insert a record into your DynamoDB table. If your table and state machine live in separate accounts, you probably can’t use this shortcut and have to go with selecting a pre-configured IAM policy instead.
Troubleshooting
When you create the state machine it will set up its required permissions to call the API Gateway. If you change the API Gateway endpoint later, and encounter a 403 response code then you need to fix the permissions yourself or recreate the state machine.
Another reason for a 403 response may be that you only created the API Gateway, but didn’t deploy it.
Within the first minute after creating the state machine you might encounter an error message like below:
Neither the global service principal states.amazonaws.com, nor the regional one is authorized to assume the provided role.
Wait a bit and try again. The policies need a moment to propagate.
4. Cron Job
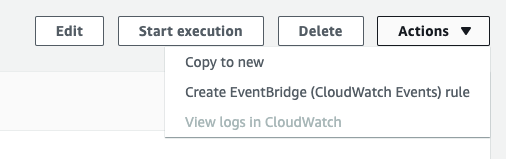
To set up a Cron Job that runs every minute, go to the overview of your state machine, in the top right open the Actions dropdown, and select “Create EventBridge (CloudWatch Events) rule”.
You are redirected to the Create Rule wizard of EventBridge, where you can select a Schedule pattern. Set it to a
fixed rate of 1 Minute. As the target select Step Functions state machine and pick the state machine you created before.
You can keep the remaining defaults.
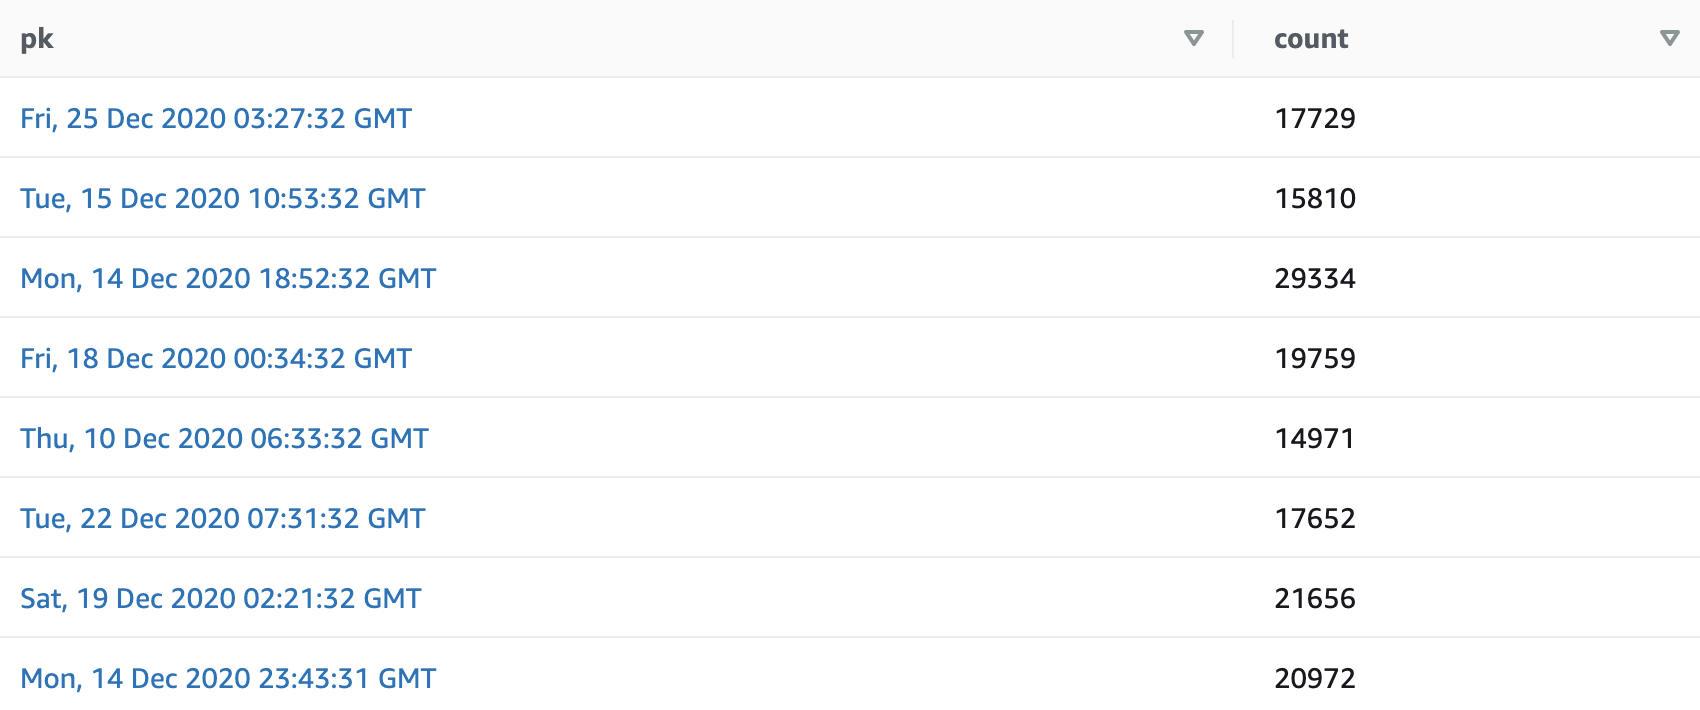
That’s it. Your state machine will now be invoked every minute. Let it run a few minutes and check your DynamoDB table. Your result should look like the picture below.
Limitations
Prohibited Authorization Header
Due to security considerations Step Functions prohibits some headers in the API Gateway integration.
Authorization is one of them. This means that we can’t send an Authorization header to 3rd party APIs.
Workaround: In API Gateway you can edit the request mapping. This allows you to map an incoming header like MyCustomAuth to the header Authorization.
This way you can use authentication, even though Step Functions won’t let a header called Authorization pass.
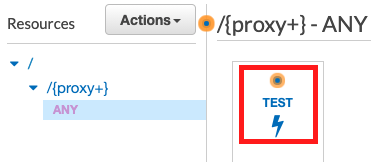
To set this up, first go to your API and select the Resources. Navigate to the proxy path’s ANY method and change the Method Request to require the header MyCustomAuth.

Go to the Integration Request and add an HTTP Header mapping which maps method.request.header.MyCustomAuth to Authorization.

Save, deploy and test it against an endpoint that requires authentication. Instead of passing in an Authorziation header from
your Step Function, use the header MyCustomAuth.
256 KB Result Size Limit
The result of each download step must be no more than 262,144 bytes (or 256 KB) for both Standard and Express Workflows.
If the result of the request is larger than this and is a JSON response, you can try reducing it with a ResultSelector.
I hit this limit with EVE Online’s market endpoints that can return up to 50 MB over more than 300 pages for the largest market.
Debugging
I suggest that you start developing your state machine with Standard Workflows. They offer a lot more insight than Express Workflows and help you with debugging errors. Keep in mind that Express Workflows don’t support all the features that Standard Workflows do.
Limited Concurrency
Step Functions may limit concurrent executions. There’s a concurrency limit of 40, after which Step Functions may wait until previous iterations completed.
In my tests the maximum was 60 concurrent executions.
Someone suggested that one could nest multiple Map tasks to get 40x40 concurrent executions, but in my tests with nested Map tasks the there were no more than 60 concurrent executions.
Price
Standard Workflows are expensive for the Downloader Pattern, as the price for state transitions combined with the limitation in download size doesn’t really offset the price for an alternative compute runtime like Lambda. The cost for state transitions becomes significant if you run hundreds or thousands of parallel state machines.
Express Workflows charges per 100ms, which might be based on Lambdas pricing model. AWS Lambda recently reduced their billing increments to 1ms, so you might pay a bit less with Lambda if most of your requests finish within a couple milliseconds.
You can find more details on the Step Functions Pricing page.
Conclusion
The Step Functions Downloader Pattern is a nice way to show that workflows can be built without functions, but reaches its limits with more complex or heavy workloads.
The Downloader Pattern is nice for very simple “get and store” workflows. You’ll see how this can be applied to more complex workflows in the next article.
Enjoyed this article? I publish a new article every month. Connect with me on Twitter and sign up for new articles to your inbox!