
4 Ways To Reduce Your Serverless Spending
01 Jul 2021One commonly used argument for serverless is that you only pay for what you use. AWS however gives you the option to commit to a certain spending, in exchange for lower prices. The three services commonly used in serverless applications that can offer commitment based prices are CloudFront, Lambda and DynamoDB. You can also downgrade the S3 storage class if you don’t need the highest object durability.
This article will describe each option, tell you at what spending a commitment starts to make sense, where to find AWS’ recommendations, and where to make the purchase.
CloudFront Savings Bundle
CloudFront is mostly used as a Content Delivery Network (CDN) which can act as a cache that lives very close to your users. It has a Savings Bundle which can get you up to 30% of savings. If you commit to paying $70 for CloudFront per month, it will cover $100 in CloudFront spending. You will be charged monthly without any initial upfront payment. This means that your bill will likely just go down a little, with no spending spikes due to upfront payments. You’ll have to commit to paying monthly for 1 year.
The CloudFront Savings Bundle becomes interesting from $10 per month. The bundle applies to all CloudFront charges, including data transfer charges, request charges, and Lambda@Edge charges.
The best thing about this bundle is that you commit to a monthly spending, which is very accessible, even with a low usage. Whereas the Lambda and DynamoDB options require an hourly commitment, this one doesn’t care about spikey workloads and inconsistent traffic.
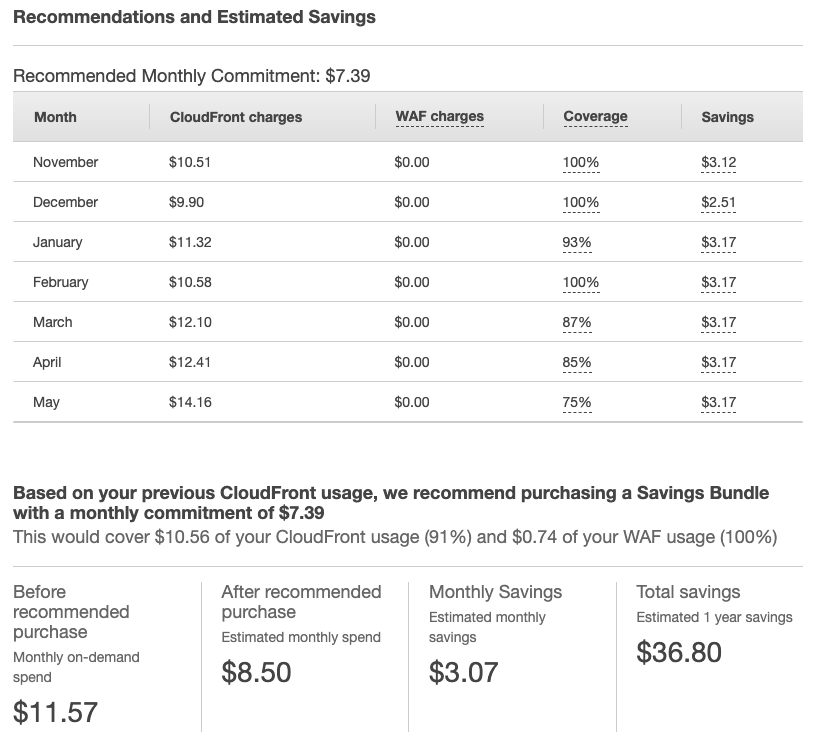
To see if the bundle makes sense for you, go to the AWS Console, open the CloudFront service, and navigate to Savings Bundle - Overview in the lefthand navigation. Click on the button Get Started. If you are already paying for CloudFront, it should give you an overview of your previous spending. You can use that information to estimate your spending for the upcoming months. CloudFront also gives you a recommendation on how much you should commit to, while maximizing the utilization (and therefore not paying for unused commitment).
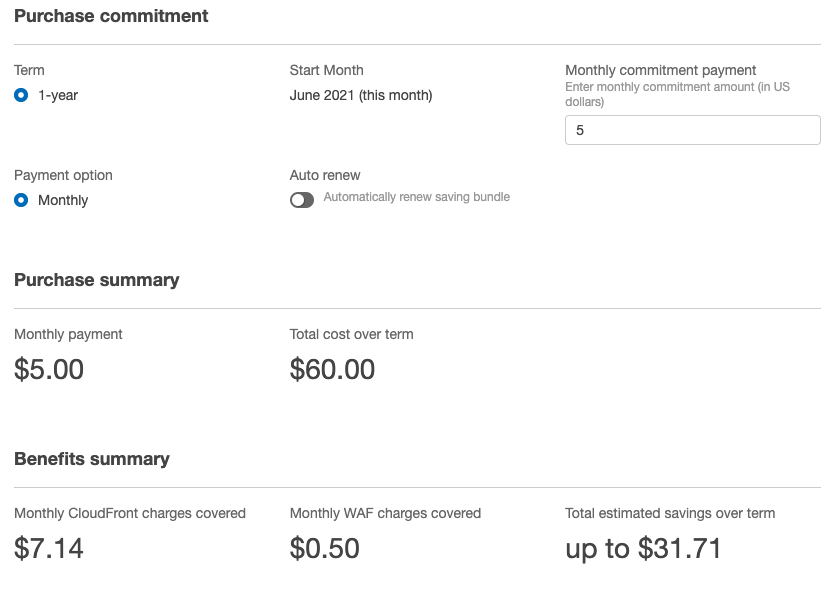
Click on Next to finalize the details, where you should disable the auto-renewal. You can always buy another savings plan, but you can’t cancel it after you committed to the 1-year term. When you’re ready, enter an amount that you feel comfortable with, and continue to checkout.
If you have more questions about the CloudFront Savings Bundle, then check out the docs.
Compute Savings Plan for Lambda
Compute Savings Plans for Lambda require an hourly commitment, and can get you up to 17% of savings. You may choose between all upfront, partial upfront (50/50), and no upfront. All upfront gets you 17%, partial gets you 15% and no upfront gets you 12% of savings.
I recommend this plan if your compute spending exceeds $100 per month, and if the compute is spread out over each day. If you commit to an hourly spending, but don’t use it for 12 hours each day, you may overpay. The Lambda free tier can cut into your gains from this spending plan, as it did for me with about 3-4 days of each month being covered by the free tier.
With a significant spending, the console will give you a recommendation. It’s probably best to follow that recommendation and don’t do the math yourself. To get a recommendation, go to the Cost Explorer service, and navigate to Savings Plans - Recommendations on the lefthand side.
 Source: Savings Plans for AWS Compute Services
If in doubt, start small with a few cents, and add more Compute Savings Plans later. You can always purchase more Compute Savings Plans, but you can’t return already purchased ones as far as I know.
To purchase a Compute Savings Plan, go to the Cost Explorer service, and navigate to Savings Plans - Purchase Savings Plans on the lefthand side. Keep the Compute Savings Plans type, select a commitment term, an hourly commitment and a payment option. The more upfront, the higher your savings. Review your order, and if you’re comfortable with it, submit the order.
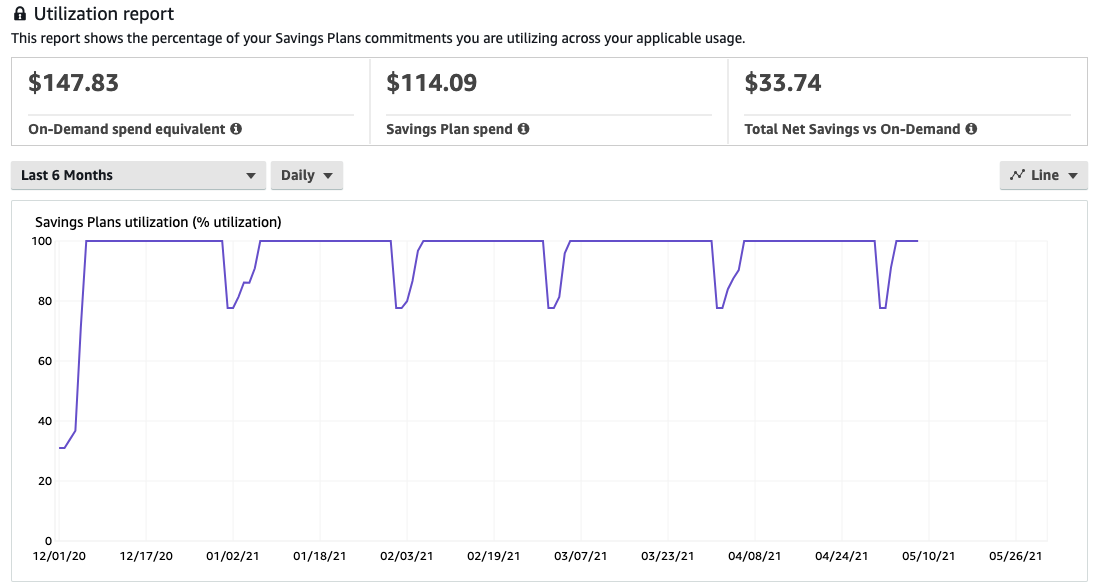
A couple of days after purchasing a Compute Savings Plan you can inspect the utilization. You can find this information by going to the Cost Explorer service, and navigate to Savings Plans - Utilization Report on the lefthand side.
One lucky benefit of Compute Savings Plans is that they don’t only apply to Lambda. Fargate and EC2 are covered as well, with even better savings rates. If you add an EC2 instance, your Savings Plan will automatically prefer the compute usage which gets you the most savings.
DynamoDB Reserved Capacity
The spending for DynamoDB provisioned capacity can be improved by purchasing reserved capacity for write or read operations. You may purchase reserved capacity in batches of 100 units. Based on my napkin math, this option makes sense from $50 spending on write capacity, or $20 spending on read capacity. Reserved capacity is applied to all tables in a single region. If you want to cover multiple regions, you’ll have to purchase reserved capacity for each of them. Reserved capacity is not available in on-demand mode.
By comparing the total hourly cost of reserved capacity including upfront payment and non-reserved capacity, I calculated a savings rate of 45%.
To see the prices for reserved capacity, check out DynamoDB’s pricing page, scroll down to the detailed pricing, expand the section Read and write requests, and scroll down to Reserved capacity. With DynamoDB Reserved Capacity you have to partially pay upfront, and commit to an hourly spending at a reduced rate. In return for this payment, you don’t get additional charges for the 100 Capacity Units that you purchased. You still pay for data storage, transfer and other AWS charges.
To purchase reserved capacity, go to the DynamoDB service, and open Reserved capacity from the lefthand navigation. This page will show you the approximate provisioned read and write capacity. Continue by clicking on Purchase reserved capacity, pick a capacity, term and how many units you want to reserve. There seems to be no downside to picking a shorter term, so I suggest going with 1 year. You can always buy another one, but you can’t return one that you already purchased. Start small and add more when you have data. Once you’re comfortable with your selection, click on Purchase reserved capacity, and you’re done.
S3 Storage Tiers
S3 doesn’t offer savings plan similar to the previous options, but it has various storage classes that differ in price. In this article we only consider S3 Standard, Intelligent Tiering, Infrequent Access, and One-Zone Infrequent Access. You can lower your storage cost by choosing a lower tier by roughly 50%, but the price for request and data retrievals may go up by a factor of 2.
You can achieve the best savings for data you access infrequently, and where you don’t need the highest durability. It’s probably not be okay to lose receipt documents, but might be okay for a few pictures out of training dataset containing millions of items.
The S3 Standard tier offers you the highest availability of 99.99% at $0.023 per GB, $0.005 per 1,000 write requests, and $0.0004 per 1,000 read requests.
With S3 Intelligent - Tiering AWS will automatically move your data to a more appropriate storage class depending on your usage pattern, and offers 99.9% availability. This is the most hands off approach which lets you save money without you having to figure out the best tier. If you like automatic savings, choose the Intelligent Tiering. Keep in mind though, that this tier will charge $0.0025 per 1,000 objects in your bucket to monitor and transition the objects to a more fitting storage tier.
The S3 Standard Infrequent Access tier is 45% cheaper with 99.9% availability at $0.0125 per GB stored. 1,000 write requests cost $0.01, and 1,000 read requests $0.001.
The S3 One-Zone Infrequent Access tier is 64% cheaper with 99.5% availability at $0.01 per GB stored. 1,000 write requests cost $0.01, and 1,000 read requests $0.001. Beware that with this tier your data will only be stored in one availability zone, and might be lost in case of a disaster.
All storage tiers offer 99.999999999% object durability for the covered availability zones.
To figure out which bucket causes significant spending, you can use the S3 Storage Lens or tag your buckets to drill down on spending in the Cost Explorer.
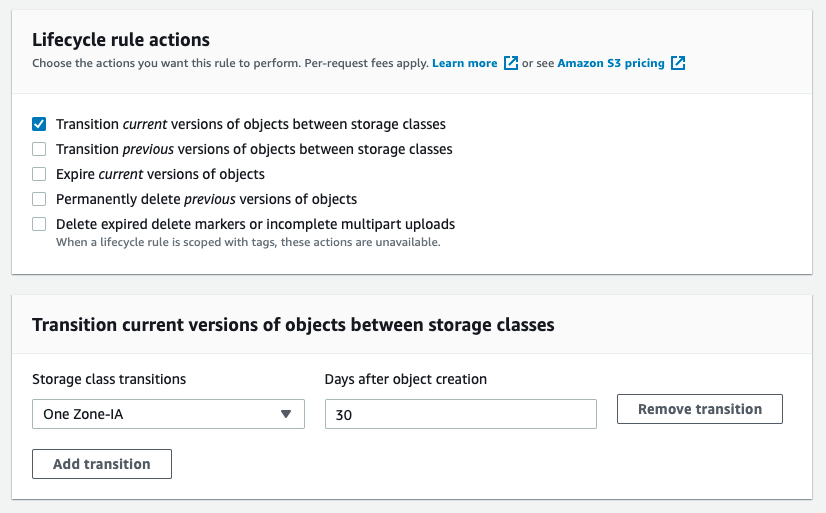
The storage class is defined per bucket. Open a bucket, go to the Management tab and create a new lifecycle rule. In the wizard of the new lifecycle rule you need to pick a Lifecycle rule action which transitions an object between storage classes. Pick a target storage class, and define after how many days an object should move there.
Create the rule, and your bucket will automatically move objects to the new storage class, which will reduce your storage cost for the objects in that bucket. Monitor your Cost Explorer over the next days, to see how this affects your spending.
Enjoyed this article? I publish a new article every month. Connect with me on Twitter and sign up for new articles to your inbox!