
How To Use AWS Route53 Wildcard Subdomains With CDK
01 Sep 2020Back in 2019 I built an online ticketshop for sports clubs. In its core, the shop was a webapp that processes payments and sends PDF via email. When it came to customization, things got tricky: Each club had a different name, different pictures, and sometimes even different questions they wanted to ask their customers. To give each of the clubs a customized experience, we provided each of them with their own subdomain. Eventually there were six different frontend deployments, multiple branches and the code bases started to diverge. Recently I learned that you can use DNS ARecords to route all requests under a certain domain to the same frontend. Thanks to DongGyun!
This article explains how you can point multiple subdomains to the same frontend deployment by creating DNS records and a static website with the AWS Cloud Development Kit (CDK). That will enable you to give each of your customers a customized experience, while having just one frontend deployment.
Shortcut: If you don’t need Infrastructure as Code (IaC), then an ARecord in Route 53 with *.yourdomain.com that points to your existing CloudFront distribution gets you the same result.
The magic is in the chapter “Wildcard Routing”. Check out the full source code on GitHub.
Prerequisites
To deploy the solution of this article, you should have an AWS account and some experience with the AWS CDK. It’s also good to have an unused domain registered in Amazon Route 53, but we will learn how to use other providers and used domains as well.
This article uses CDK version 1.60.0. Let me know if anything breaks in newer versions!
Please bootstrap your account for CDK by running cdk bootstrap. We will need this for the DnsValidatedCertificate.
Optional: Understanding how DNS and especially nameservers work will help you a lot with troubleshooting potential routing issues.
The Solution
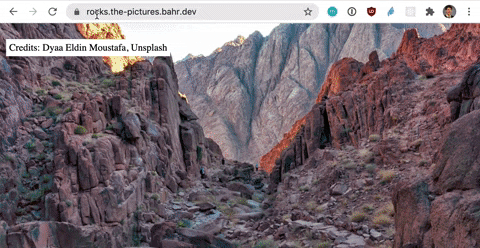
Let’s find a solution by putting us in the customers shoes. As a customer I want to go to bear.picture.bahr.dev or forest.picture.bahr.dev or any other address in the format *.picture.bahr.dev and then see a picture for the word in the beginning. As a developer I want the least amount of complexity possible. Multiple frontend deployments increase complexity.
The request flow would look like this:
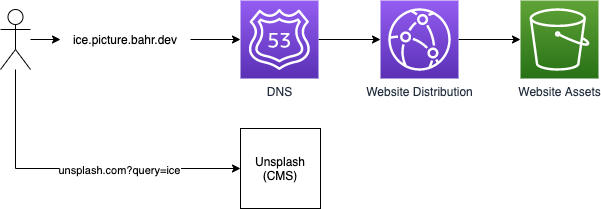
You can see above that only the domain changes, but nothing else. At the core of the solution are wildcard ARecords which let us route traffic for any subdomain to a particular target. The website can then take the URL, extract the subdomain and ask for the right picture. In the next chapter we will take a look at each part in detail.
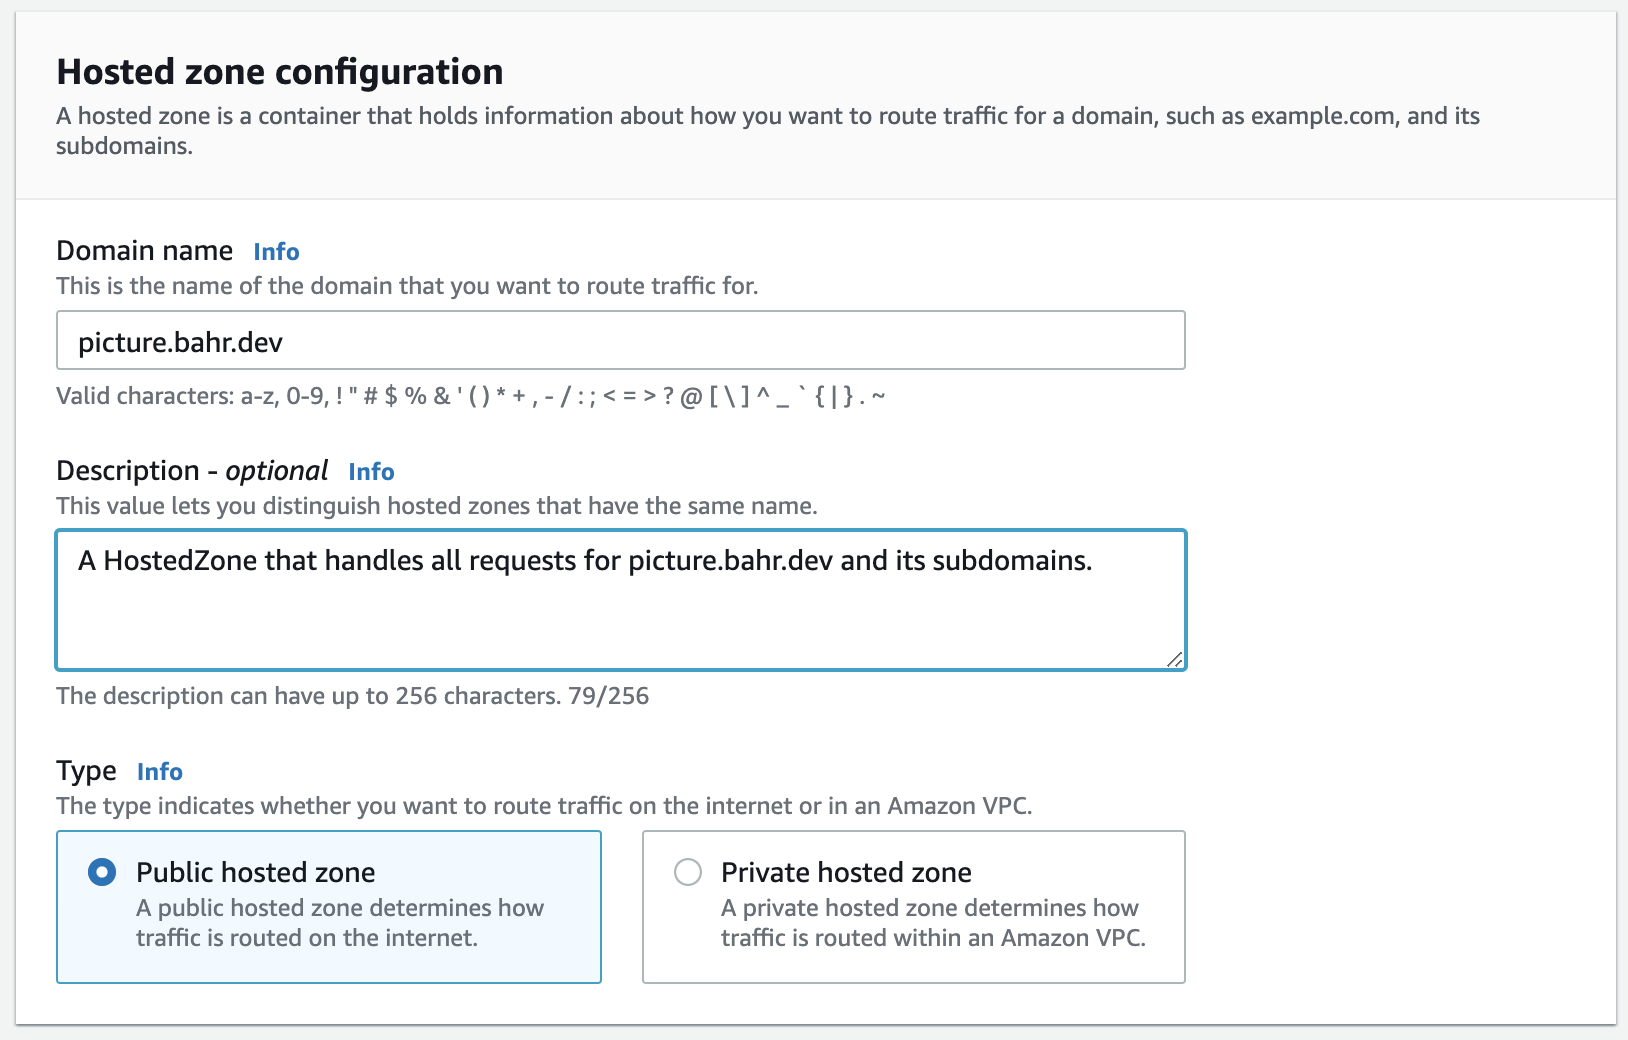
1. Create A Hosted Zone
To register DNS records in AWS, we need to create a Hosted Zone in Route 53. Each Hosted Zone costs $0.50 per month.
The Hosted Zone is easiest to set up if you have a domain that is managed by Route 53 and that you don’t use for anything else yet.
We will also look at how you can set up your Hosted Zone if you are already using your Route 53 domain for another purpose (e.g. your blog) or if that domain is managed by a different provider than Route 53.
Depending on who manages your domain (e.g. Route 53 or GoDaddy) and if you already use your apex domain for other websites, you have to tweak the solution a bit. In my example, I already use my apex domain bahr.dev for my blog, and have the domain managed by GoDaddy. We will see how to specify the right records there in the following chapters.
Warning: Before deleting hosted zones, please make sure you delete all related records in the root hosted zone or third party provider. Dangling CNAME and NS records might allow an attacker to serve content in your name.
1.1. Fresh Domain That Is Managed By Route 53
This is the easiest path. All we need is a Hosted Zone for our domain.
import { HostedZone } from '@aws-cdk/aws-route53';

...
const domain = `bahr.dev`;

const hostedZone = new HostedZone(this, "HostedZone", {
    zoneName: domain
});
Route 53 can now serve DNS records for that domain.
1.2. Used Domain That Is Managed By Route 53
This assumes that you already have a Hosted Zone for your apex domain, use your apex domain for something different and want to use a subdomain instead. An apex domain is your top level domain, e.g. bahr.dev or google.com.
We need to tell the DNS servers that information about the subdomain is in another Hosted Zone and do this by creating a ZoneDelegationRecord.
import { HostedZone } from '@aws-cdk/aws-route53';

...

// bahr.dev is already in use, so we'll start
// at the subdomain picture.bahr.dev
const apexDomain = 'bahr.dev';
const domain = `picture.${apexDomain}`;

// as above we create a hostedzone for the subdomain
const hostedZone = new HostedZone(this, "HostedZone", {
    zoneName: domain
});
// add a ZoneDelegationRecord so that requests for *.picture.bahr.dev
// and picture.bahr.dev are handled by our newly created HostedZone
const nameServers: string[] = hostedZone.hostedZoneNameServers!;
const rootZone = HostedZone.fromLookup(this, 'Zone', {
  domainName: apexDomain
});
new ZoneDelegationRecord(this, "Delegation", {
    recordName: domain,
    nameServers,
    zone: rootZone,
    ttl: Duration.minutes(1)
});
A low time to live (TTL) allows for faster trial and error as DNS caches expire quicker. You should increase this as you make you get ready for production.
We will later add ARecords, so that requests to picture.bahr.dev and *.picture.bahr.dev go to the same CloudFront distribution. bahr.dev will not be affected.
1.3. Domain Is Managed By A Provider Other Than AWS
Again we will create a Hosted Zone in Route 53, but this time we need manual work to register the nameservers of our Hosted Zone with our DNS provider. To get started, first create a Hosted Zone through the AWS console.
This will give us a Hosted Zone with two entries for Nameservers (NS) and Start Of Authority (SOA). We will copy the authoritative nameserver, and tell our DNS provider to delegate requests to our Hosted Zone in AWS.
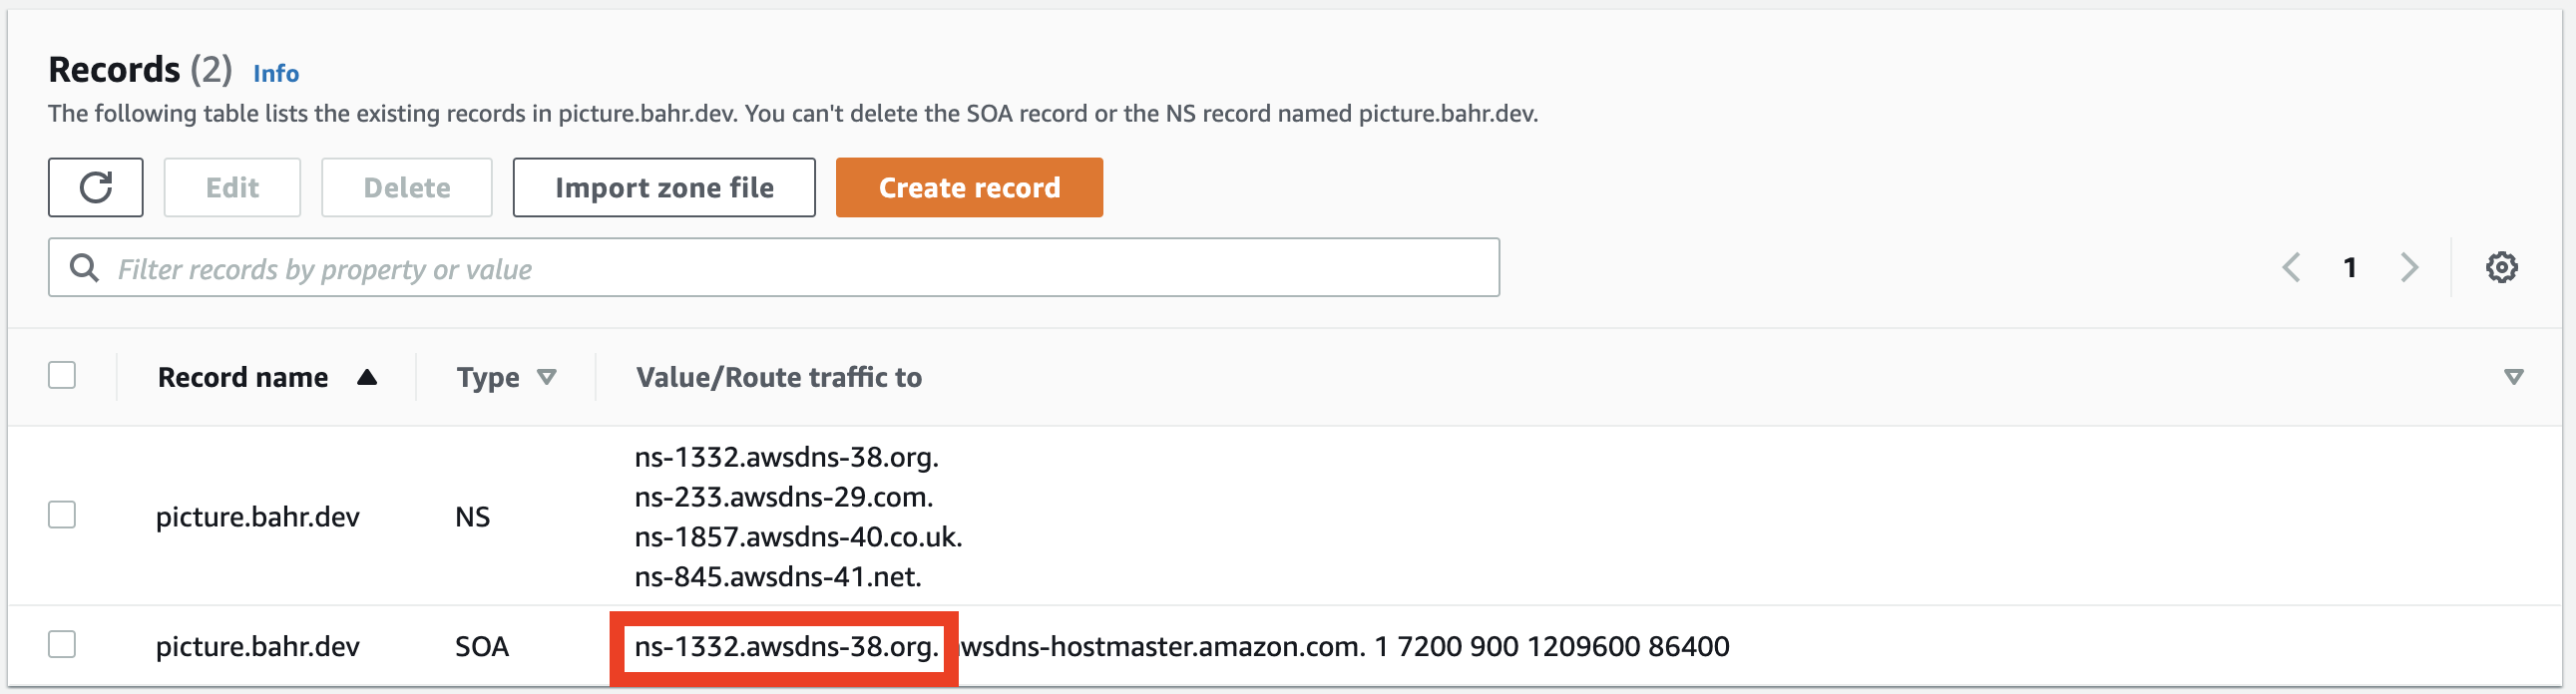
Copy the authoritative nameserver from the SOA record, go to your DNS provider and create a nameserver record, where you replace the values for Name and Value:
Type: NS
Name: picture
Value: ns-1332.awsdns-38.org
Use a specific value like picture if you want to start at a subdomain like *.picture.bahr.dev or use @ if you want to use your apex domain like *.bahr.dev.

Then use the following CDK snippet to import the Hosted Zone that you created manually.
import { HostedZone } from '@aws-cdk/aws-route53';

...

const domain = `picture.bahr.dev`;

const hostedZone = HostedZone.fromLookup(this, 'HostedZone', {
  domainName: domain
});
2. Certificate
Now that we have DNS routing set up, we can request and validate a certificate. We need this certificate to serve our website with https.
With the CDK we can create and validate a certificate in one command:
import { DnsValidatedCertificate, ValidationMethod } from "@aws-cdk/aws-certificatemanager";

...

const certificate = new DnsValidatedCertificate(this, "Certificate", {
    region: 'us-east-1',
    hostedZone: hostedZone,
    domainName: this.domain,
    subjectAlternativeNames: [`*.${this.domain}`],
    validationDomains: {
        [this.domain]: this.domain,
        [`*.${this.domain}`]: this.domain
    },
    validationMethod: ValidationMethod.DNS,
});
There’s a lot going on here, so let’s break it down.
First we set the region to us-east-1, because CloudFront requires certificates to be in us-east-1.
We then use the CDK construct DnsValidatedCertificate which spawns a certificate request and a lambda function to register the CNAME record in Route 53. That record is used for validating that we actually own the domain.
The parameter hostedZone specifies which Hosted Zone the certificate shall connect with. This is the Hosted Zone we created before.
domainName and subjectAlternativeNames specify which domains the certificate should be valid for. The remaining parameters configure the validation process.
3. Frontend Deployment
With the certificate in place, we can create a Single Page Application (SPA) deployment via S3 and CloudFront. We’re using the npm package cdk-spa-deploy to shorten the amount of code required for configuring the S3 bucket and attaching a CloudFront distribution.
import { SPADeploy } from 'cdk-spa-deploy';

...

const deployment = new SPADeploy(this, 'spaDeployment')
    .createSiteWithCloudfront({
        indexDoc: 'index.html',
        websiteFolder: './website',
        certificateARN: certificate.certificateArn,
        cfAliases: [this.domain, `*.${this.domain}`]
    });
The index.html can be an HTML file as short as <p>Hello world!</p> and should be stored in the folder ./website.
In the browser we can use JavaScript to get the subdomain. The line of code below splits the URL ice.picture.bahr.dev into an array ['ice', 'picture', 'bahr', 'dev'] and then picks the first element 'ice'.
const subdomain = window.location.host.split('.')[0];
With that information, the website can then contact the CMS to get the right assets for your customer.
4. Wildcard Routing
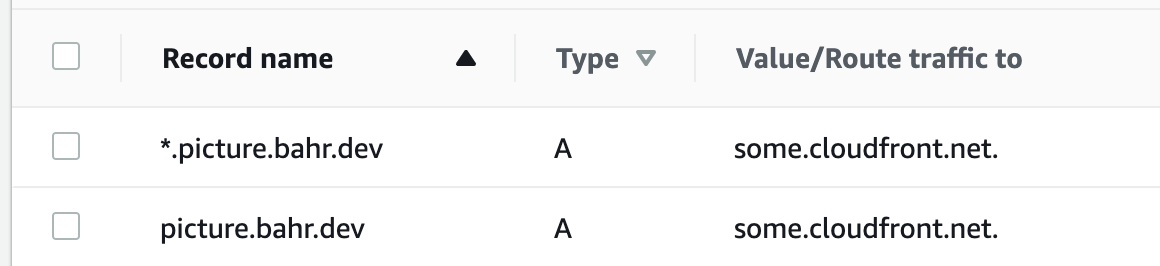
And finally it’s time for the wildcard routing. With the CDK code below, all requests to *.picture.bahr.dev and picture.bahr.dev will be routed to the frontend deployment we set up above.
import { CloudFrontTarget } from "@aws-cdk/aws-route53-targets";
import { ARecord, RecordTarget } from '@aws-cdk/aws-route53';

...

const cloudfrontTarget = RecordTarget.fromAlias(new CloudFrontTarget(deployment.distribution));

new ARecord(this, "ARecord", {
    zone: hostedZone,
    recordName: `${this.domain}`,
    target: cloudfrontTarget
});

new ARecord(this, "WildCardARecord", {
    zone: hostedZone,
    recordName: `*.${this.domain}`,
    target: cloudfrontTarget
});
Once all the DNS records have propagated, we can test our setup. Please note that deploying the whole solution sometimes takes 10 to 15 minutes.
Try It Yourself
Here’s the full CDK code that you can copy into your existing CDK codebase.
I suggest that you start with checking out the source code and adjust the domain and Hosted Zone to your needs. Add a ZoneDelegationRecord if you need it. Make sure to run cdk bootstrap if you haven’t done that yet.
import * as cdk from '@aws-cdk/core';
import { SPADeploy } from 'cdk-spa-deploy';
import { DnsValidatedCertificate, ValidationMethod } from "@aws-cdk/aws-certificatemanager";
import { CloudFrontTarget } from "@aws-cdk/aws-route53-targets";
import { HostedZone, ARecord, RecordTarget } from '@aws-cdk/aws-route53';

export class WildcardSubdomainsStack extends cdk.Stack {

  private readonly domain: string;

  constructor(scope: cdk.Construct, id: string, props?: cdk.StackProps) {
    super(scope, id, props);

    const domain = `picture.bahr.dev`;

    const hostedZone = new HostedZone(this, "HostedZone", {
      zoneName: domain
    });

    const certificate = new DnsValidatedCertificate(this, "Certificate", {
      hostedZone,
      domainName: this.domain,
      subjectAlternativeNames: [`*.${this.domain}`],
      validationDomains: {
        [this.domain]: this.domain,
        [`*.${this.domain}`]: this.domain
      },
      validationMethod: ValidationMethod.DNS
    });

    const deployment = new SPADeploy(this, 'spaDeployment')
        .createSiteWithCloudfront({
            indexDoc: 'index.html',
            websiteFolder: './website',
            certificateARN: certificate.certificateArn,
            cfAliases: [this.domain, `*.${this.domain}`]
        });

    const cloudfrontTarget = RecordTarget
        .fromAlias(new CloudFrontTarget(deployment.distribution));

    new ARecord(this, "ARecord", {
      zone: hostedZone,
      recordName: `${this.domain}`,
      target: cloudfrontTarget
    });

    new ARecord(this, "WildCardARecord", {
      zone: hostedZone,
      recordName: `*.${this.domain}`,
      target: cloudfrontTarget
    });
  }
}
Now run AWS_PROFILE=myProfile npm run deploy to deploy the solution. Replace myProfile with whatever profile you’re using for AWS. Here’s more about AWS profiles.
The deployment may take somewhere between 10 and 15 minutes. Grab a coffee and let CDK do its thing. If you run into problems, check the troubleshooting section below.
Once the deployment is done, you should be able to visit any subdomain of the domain you specified (e.g. bear.picture.bahr.dev for the domain picture.bahr.dev) and see your website.
Troubleshooting
The DNS routing doesn’t work.
A high time to live (TTL) on DNS records can make changes difficult to test. Try to lower the TTL as far as possible.
If your domain is not managed by Route 53, make sure that the DNS routing from your DNS provider is set up correctly.
If you use your apex domain for something else, make sure to set up a ZoneDelegationRecord that redirects traffic for your subdomain to your new Hosted Zone.
The deployment failed to clean up.
Depending on which step the deployment fails, not all resources can be cleaned up. This is most likely due to the CNAME record that the lambda function of the DnsValidatedCertificate created. Go to the Hosted Zone, remove the CNAME record and delete the stack by running cdk destroy or deleting it through the AWS console’s CloudFormation service.
Failed to create resource. Cannot read property ‘Name’ of undefined
Clean up the stack, remove and redeploy it. I’m not sure where that error comes from, but retrying fixed it for me.
The certificate validation times out.
Make sure you are using the right approach so that the required CNAME record will be visible to the DNS servers. If you’ve used your domain before, set up the right ZoneDelegationRecord. This can be a bit tricky so feel free to reach out to me on Twitter.
Next Steps
Check out the full source code and try it yourself! If you’d like to contribute, a PR to cdk patterns is probably a good idea.
Further Reading
Enjoyed this article? I publish a new article every month. Connect with me on Twitter and sign up for new articles to your inbox!